The Standard Transthoracic Echo Views: How to Get Each One and What You Should See
Every complete adult transthoracic echocardiogram (TTE) is built from the same set of standard views, acquired from four acoustic windows: parasternal, apical, subcostal, and suprasternal. Learning them isn't about memorizing a list of images, it's about knowing where to place the probe, which way to point the index marker, and what structures should appear when you get there. This guide walks through each standard view in the order you'll scan it, with the steps to obtain the image and the anatomy you should be able to identify in it.
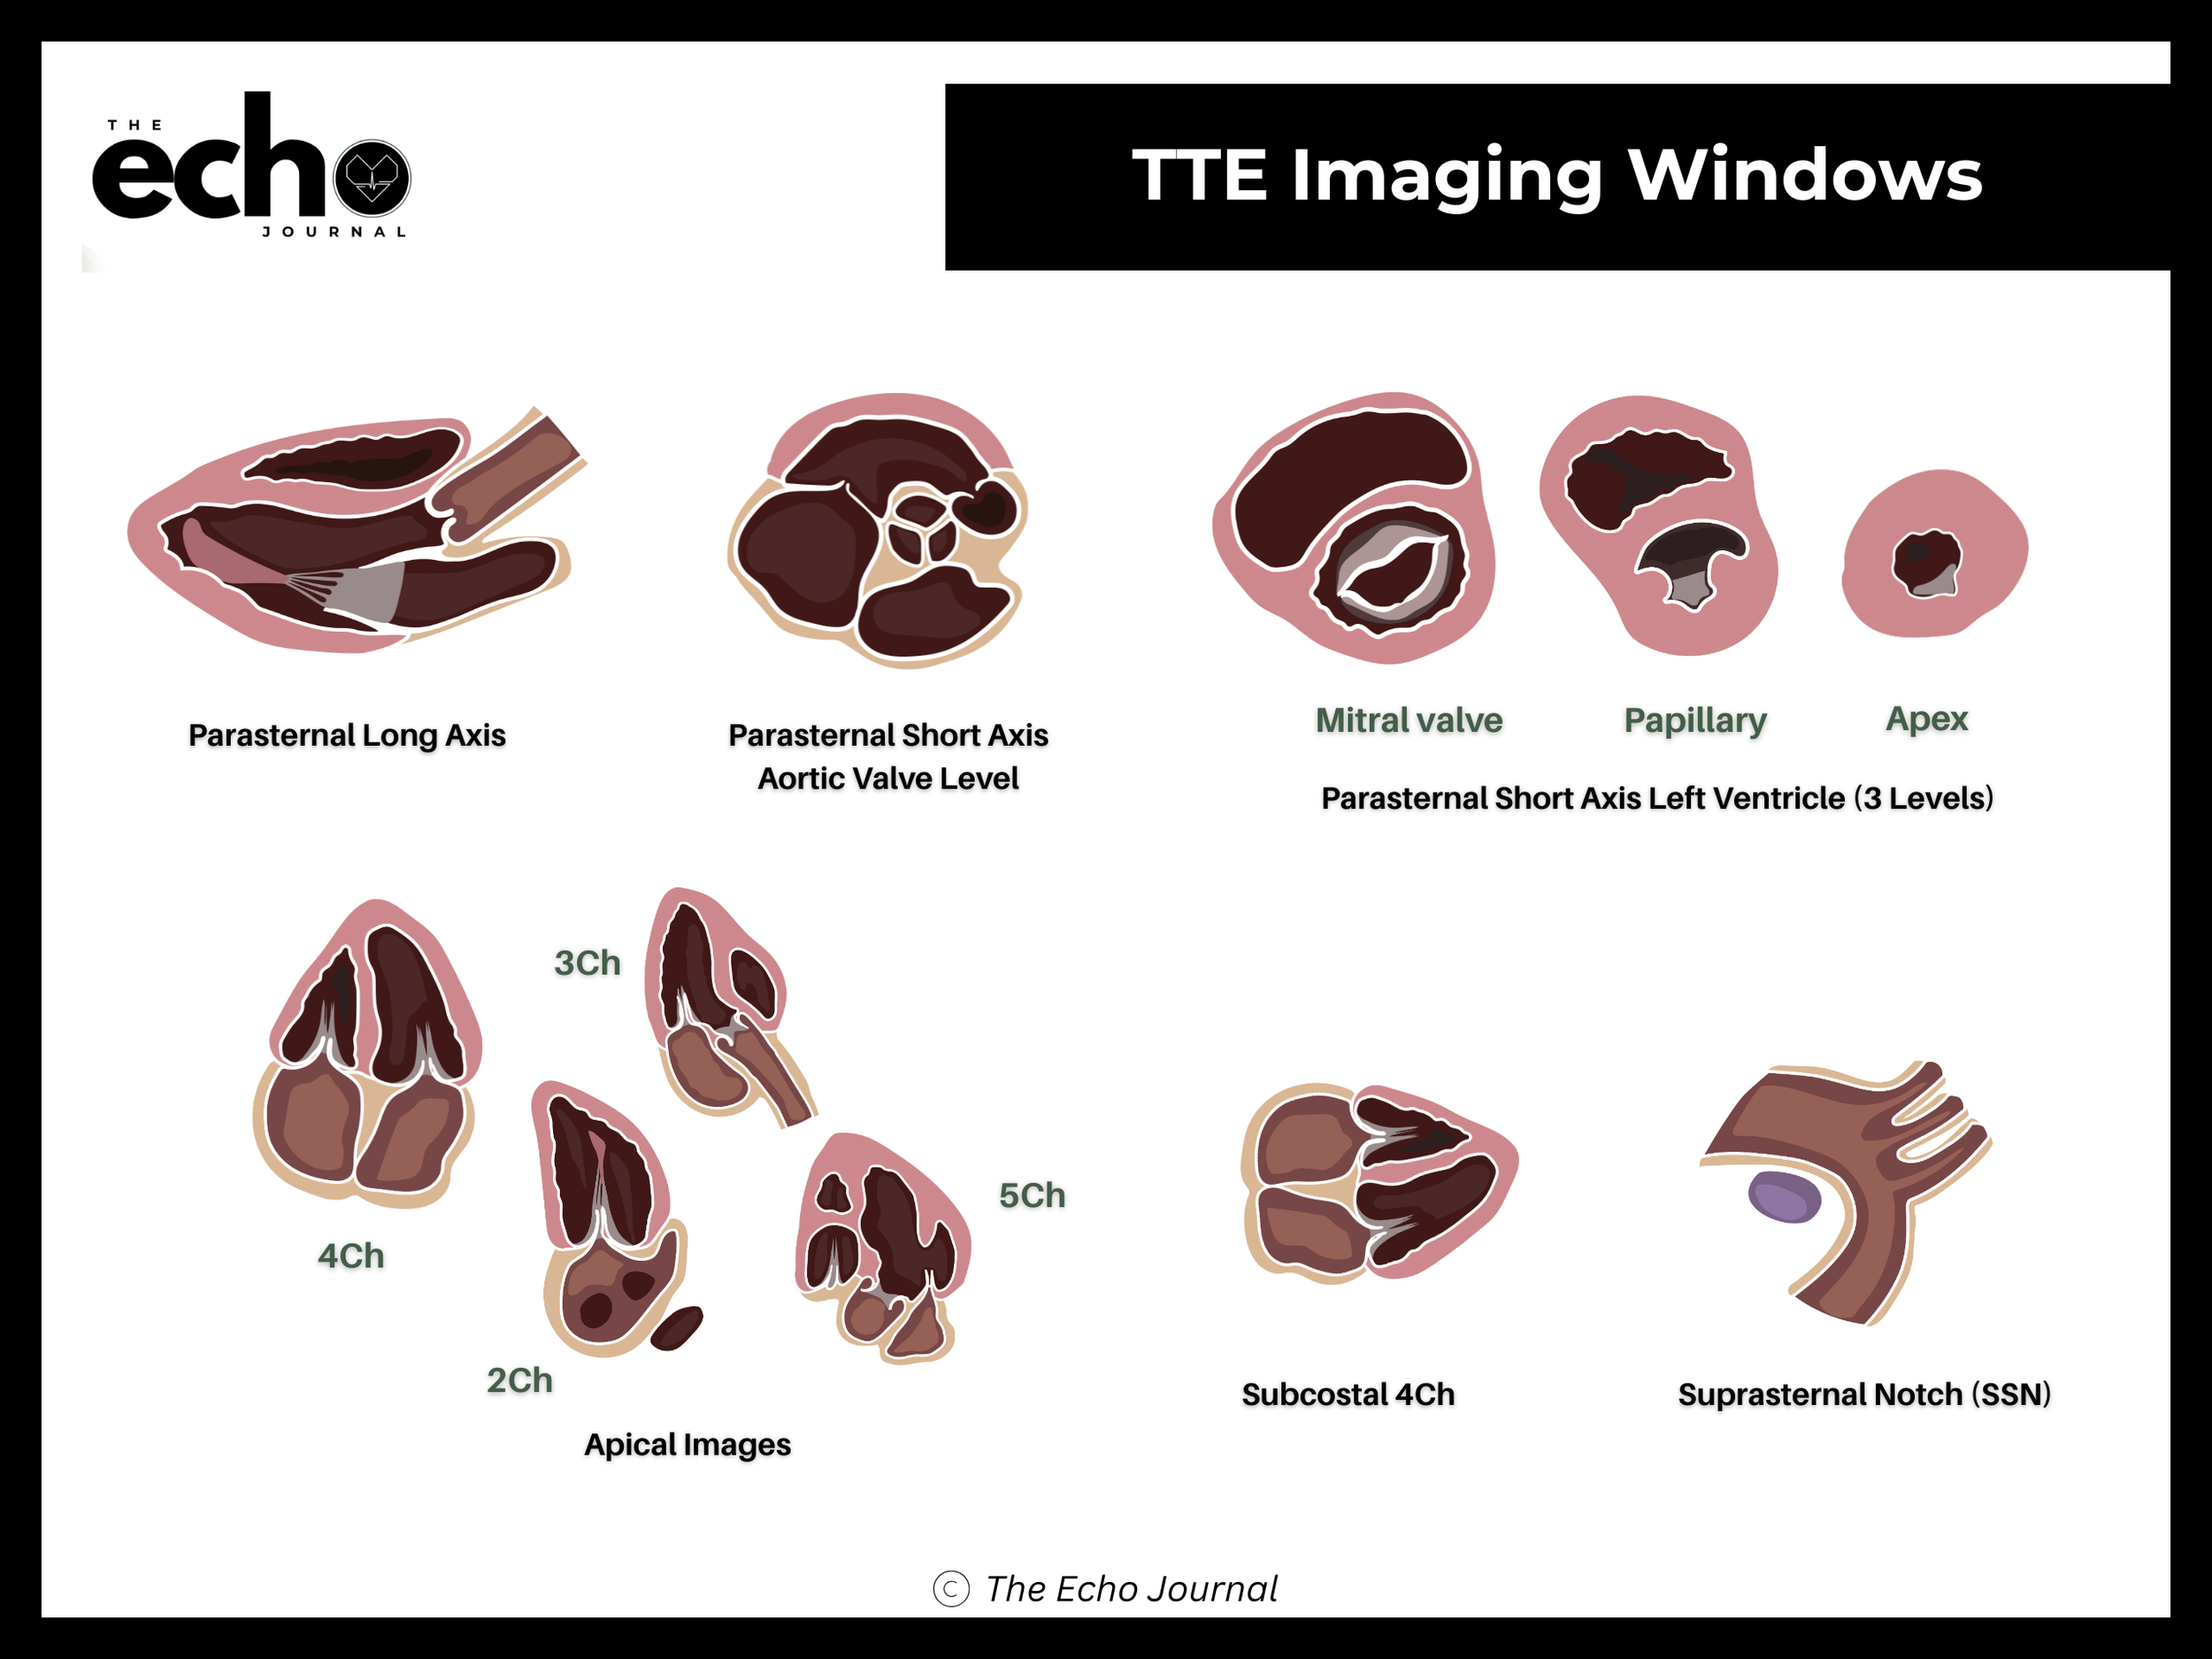
Before You Start: Four Probe Movements You Need
Almost every instruction in this article uses one of four probe movements. Learn these first and the rest of the protocol becomes much easier to follow.
Slide — move the whole probe to a new spot on the chest. You're changing where you're imaging from.
Tilt (also called fanning) — keep the probe in one spot and sweep the beam through the heart like a windshield wiper. You're changing what slice you see.
Rotate — twist the probe in place, like turning a dial. You're changing the angle of the slice through the heart.
Rock — keep the face of the probe planted and lean the handle toward one side of the image. You're centering a structure that's sitting at the edge of your sector.
One more term: the index marker is the small ridge, groove, or dot on the side of the probe. It tells you which edge of your image corresponds to which side of the patient. Every position described below is given as a clock face, where 12 o'clock points toward the patient's head and 3 o'clock points toward the patient's left side.
Setup for every parasternal and apical view: use a phased array transducer, place the patient in the left lateral decubitus position (lying on their left side, left arm up under or behind the head), and have them breathe normally. Rolling the patient left brings the heart forward against the chest wall and moves lung tissue out of your way. This one step fixes more bad images than any knob on the machine.
The Echo Journal breaks down one echocardiography topic like this every Tuesday and Thursday for over 9,000 sonographers and cardiologists worldwide.
Parasternal Long-Axis (PLAX) View
Position the patient in the left lateral decubitus position, rolled fully onto their left side, all the way onto the hip, with the left arm raised and tucked under or behind the head. This isn't optional comfort positioning; rolling the patient brings the heart forward against the chest wall and shifts lung tissue out of the beam's path.
How do you obtain a parasternal long-axis view? Place a phased array transducer in the 3rd or 4th left intercostal space, immediately beside the sternum, with the patient in the left lateral decubitus position. Point the index marker toward the patient's right shoulder (roughly 10 o'clock). The beam should cut through the long axis of the left ventricle.
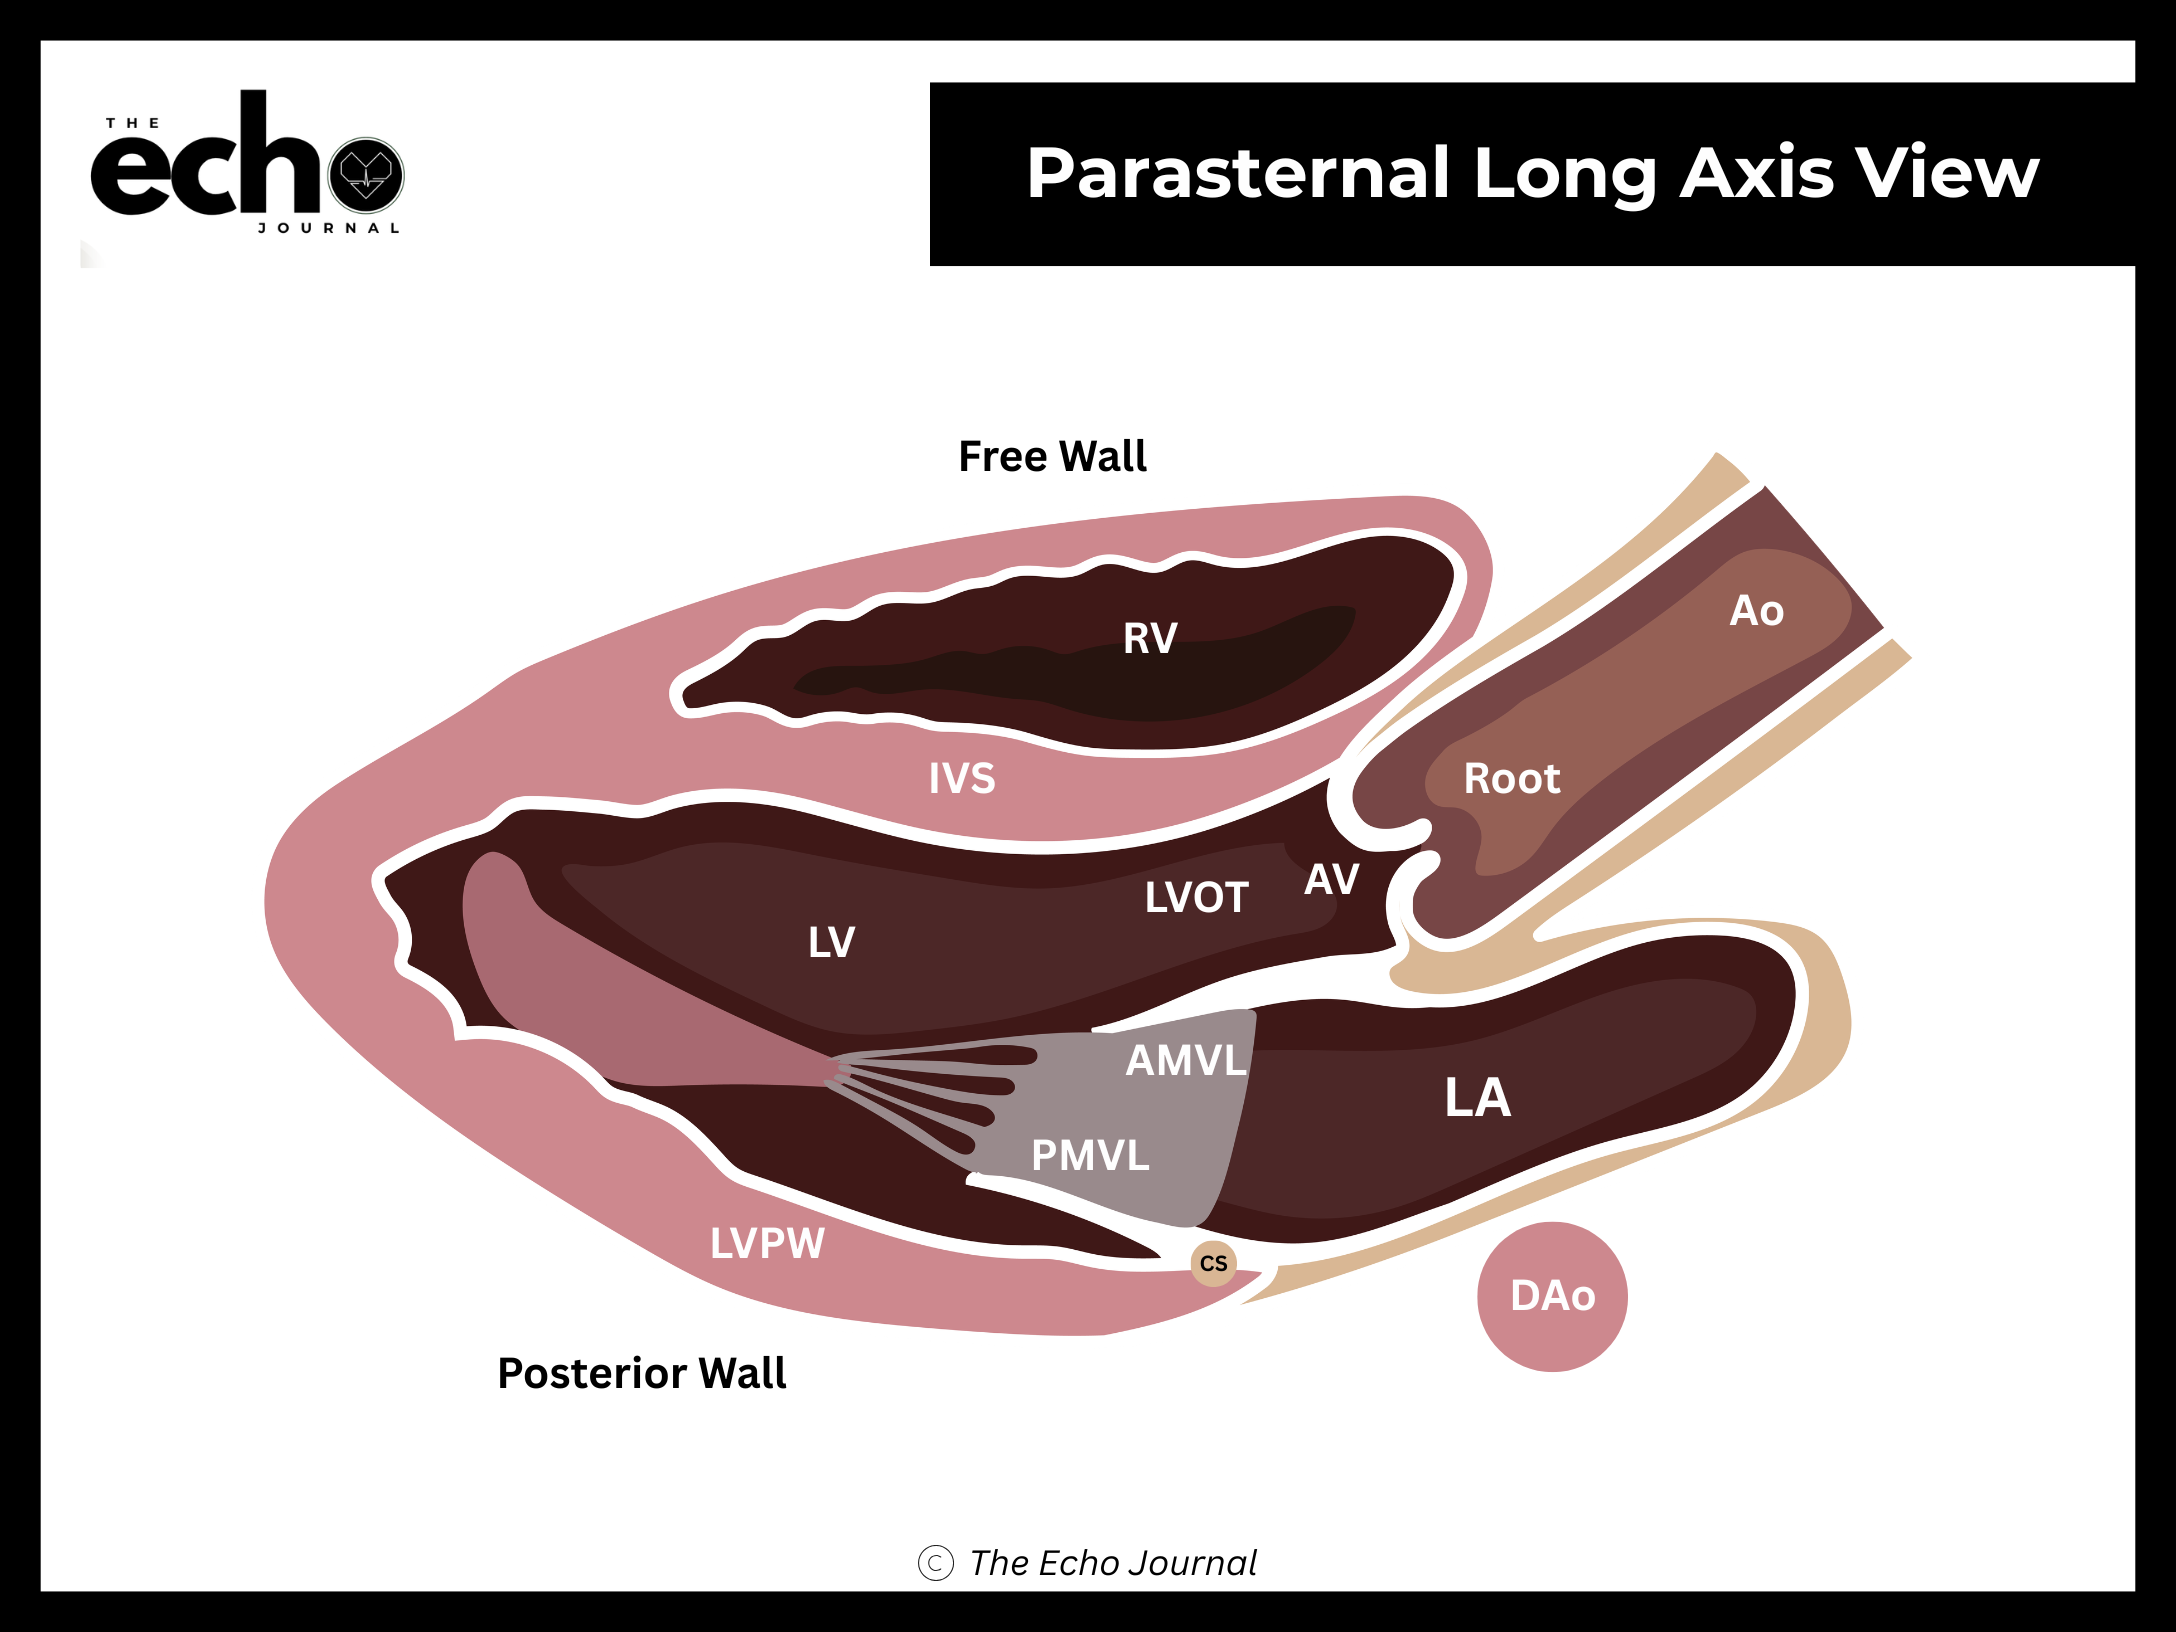
Structures you should be able to identify:
Right ventricle (RV) — the chamber closest to the probe, at the top of the image
Left ventricle (LV)
Interventricular septum (IVS)
Posterior left ventricular wall (LVPW)
Left ventricular outflow tract (LVOT)
Aortic valve (AV) and aortic root
Mitral valve (MV) — both the anterior (AMVL) and posterior leaflets (PMVL)
Left atrium (LA)
Descending thoracic aorta (DAo), seen in cross-section behind the LA
Coronary sinus (CS), can also be seen in this view and is relevant when evaluating for persistent left superior vena
Pericardium, as a bright line below the posterior LV wall and around the entire right ventricle in this view
Getting it right: the goal is a true long axis, which means the beam is perpendicular to the left ventricle and you are seeing the widest possible LV cavity. If the LV looks small or the apex creeps into the picture, you're off axis — slide up or down one interspace rather than tilting harder.
Increase your depth once. Before you move on, drop the depth to around 200 mm and take one clip. This is how you screen the pericardial space and the pleural space for effusion. A pleural effusion will track behind the descending aorta; a pericardial effusion stays in front of it. That single landmark is one of the most testable facts in the parasternal window.
Parasternal Short-Axis (PSAX) at the Aortic Valve Level
How do you obtain a parasternal short-axis view at the level of the aortic valve? From your PLAX position, do not move the probe on the chest. Rotate it about 90 degrees clockwise, so the index marker now points toward the patient's left shoulder (roughly 1–2 o'clock). You are slicing the same heart, but now in cross-section.
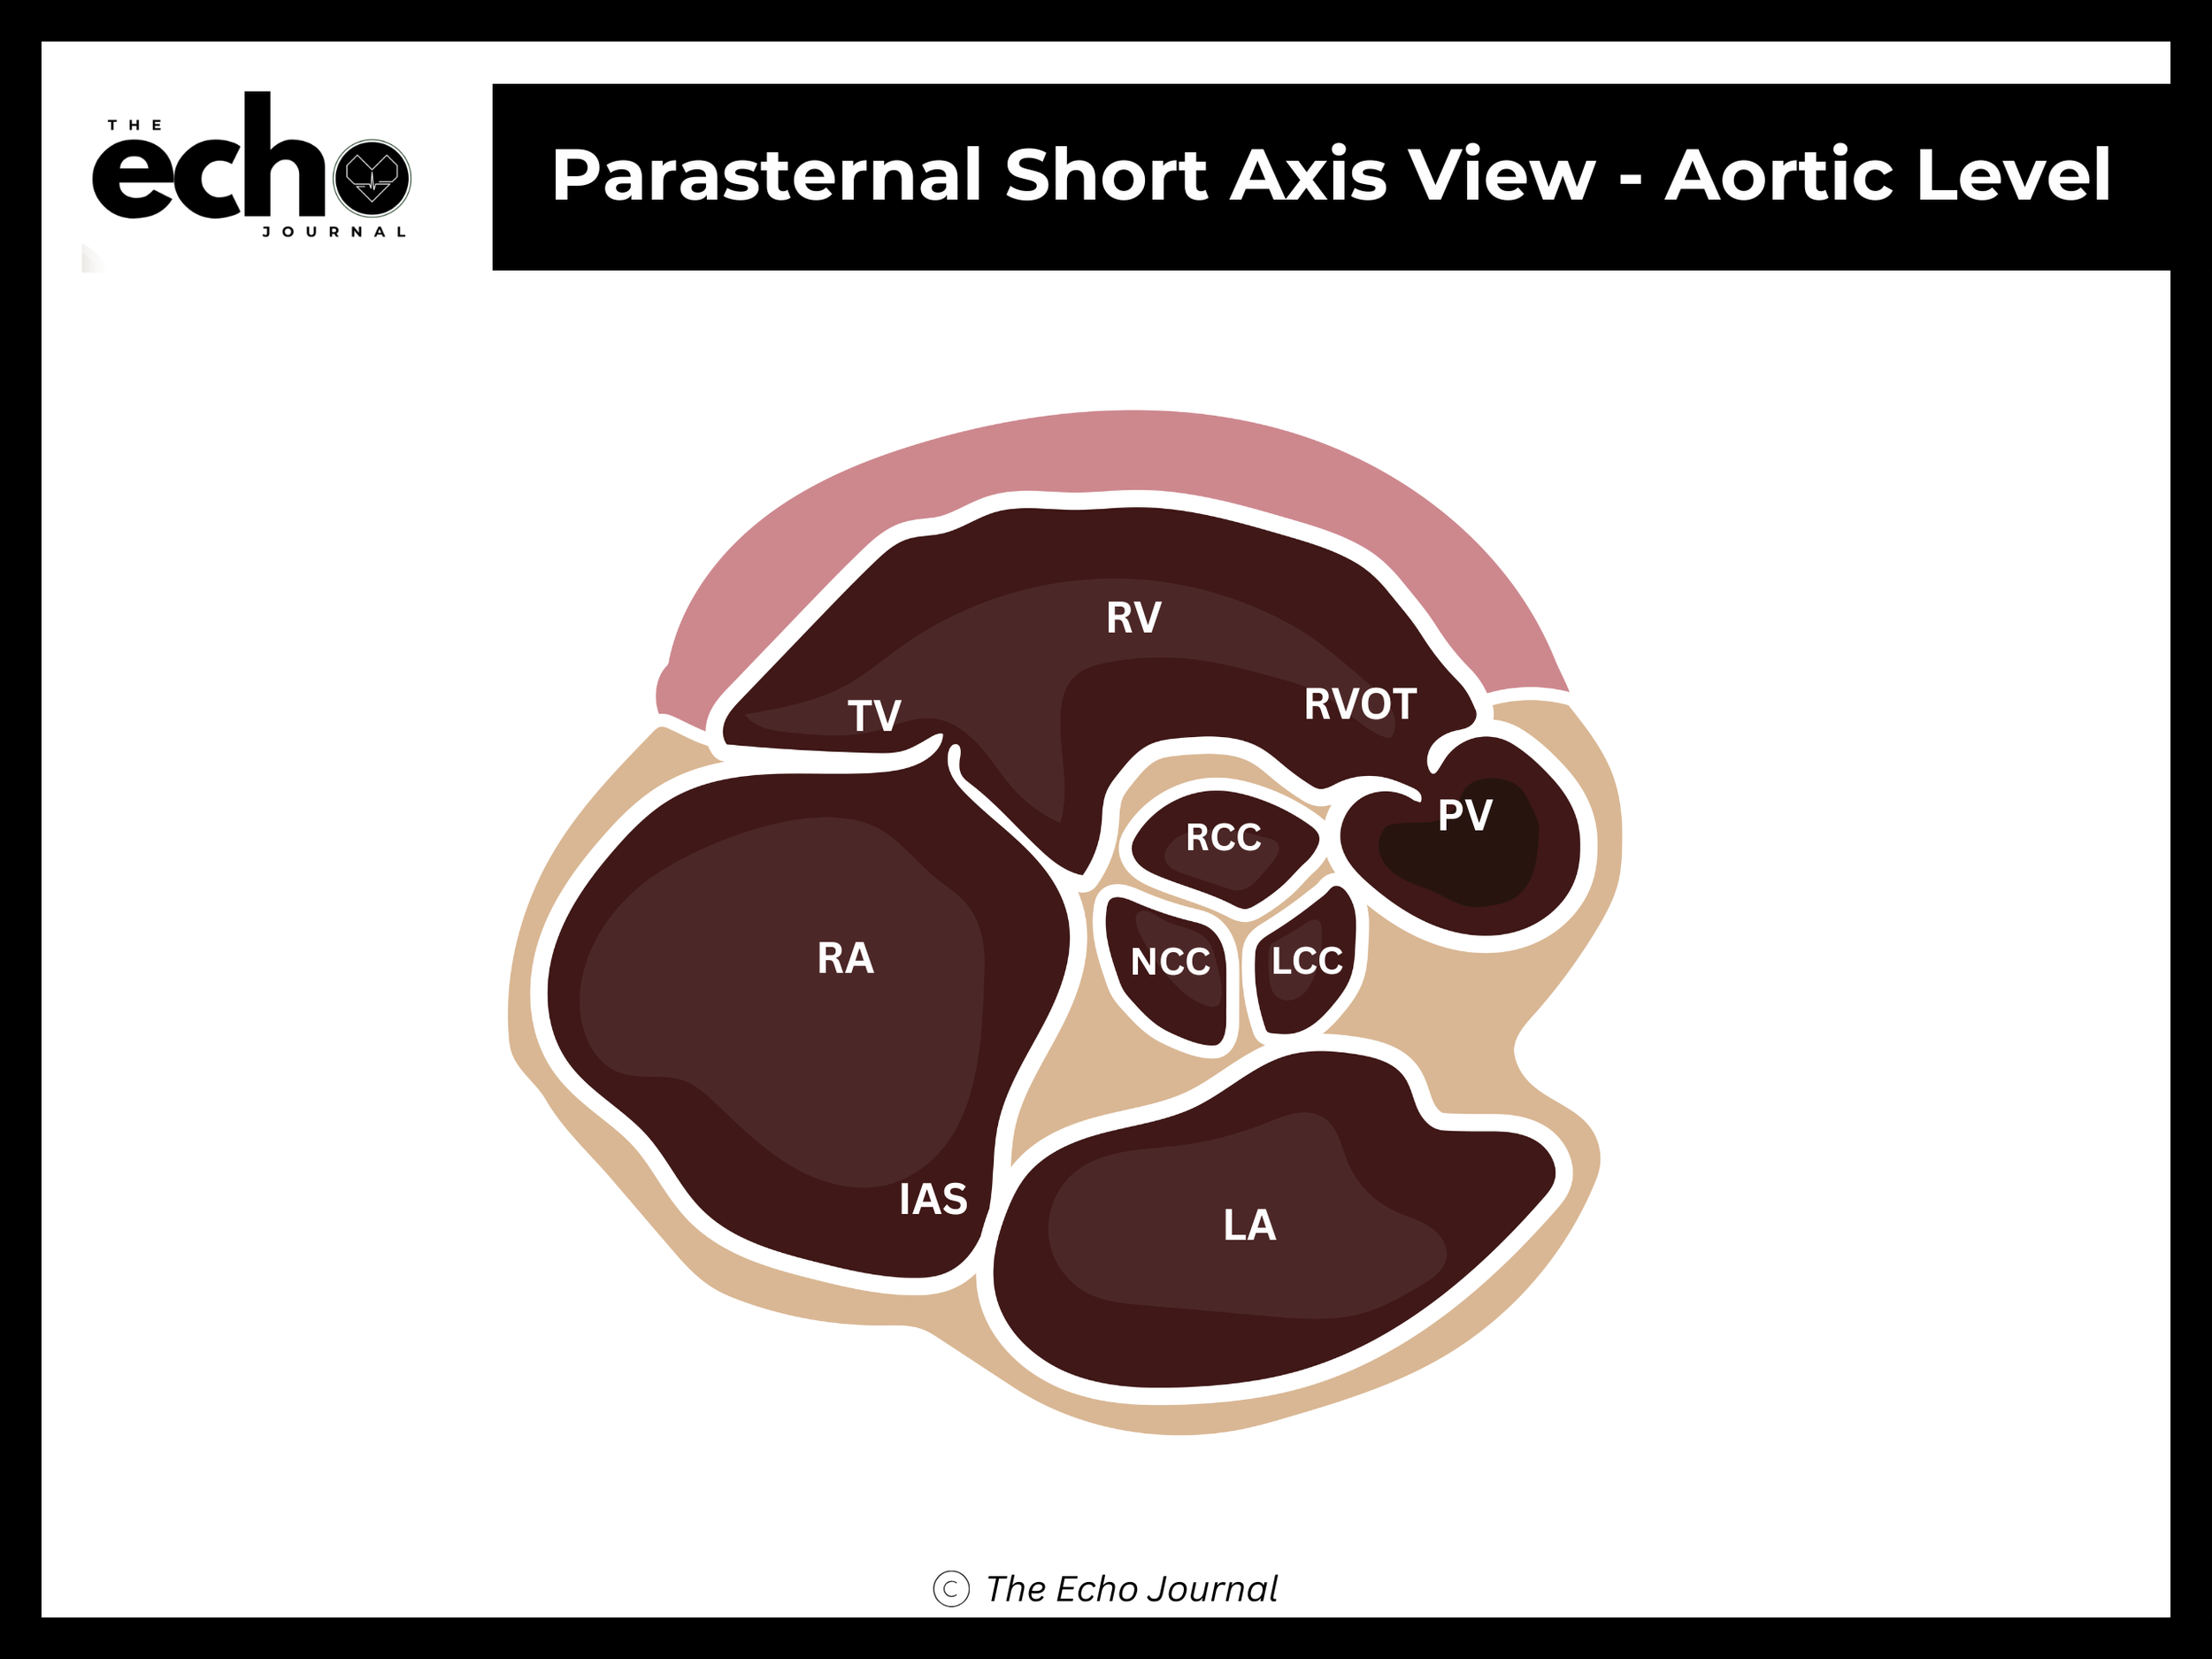
Structures you should be able to identify:
Aortic valve (AV) — the three cusps in the center, forming the classic "Mercedes-Benz" sign when closed
Right-coronary cusp (RCC)
Non-coronary cusp (NCC)
Left-coronary cusp (LCC)
Right atrium (RA)
Tricuspid valve (TV)
Right Ventricle (RV) and the right ventricular free wall are seen in this view
Right ventricular outflow tract (RVOT), wrapping around the aorta
Pulmonic valve (PV) and main pulmonary artery
Left atrium (LA)
Interatrial septum (IAS)
Getting it right: small tilting adjustments matter more than big ones here. You want all three aortic cusps in the same plane at the same time. If you only see two cusps clearly, you're cutting the valve obliquely.
Parasternal Short-Axis at the Left Ventricular Levels
How do you obtain the short-axis views of the left ventricle? Stay in the same short-axis orientation and tilt the beam inferolaterally, toward the LV apex. Practically, the tail of the probe comes down toward the chest and angles toward the patient's right shoulder. Each degree of tilt walks you down the ventricle to a new level.
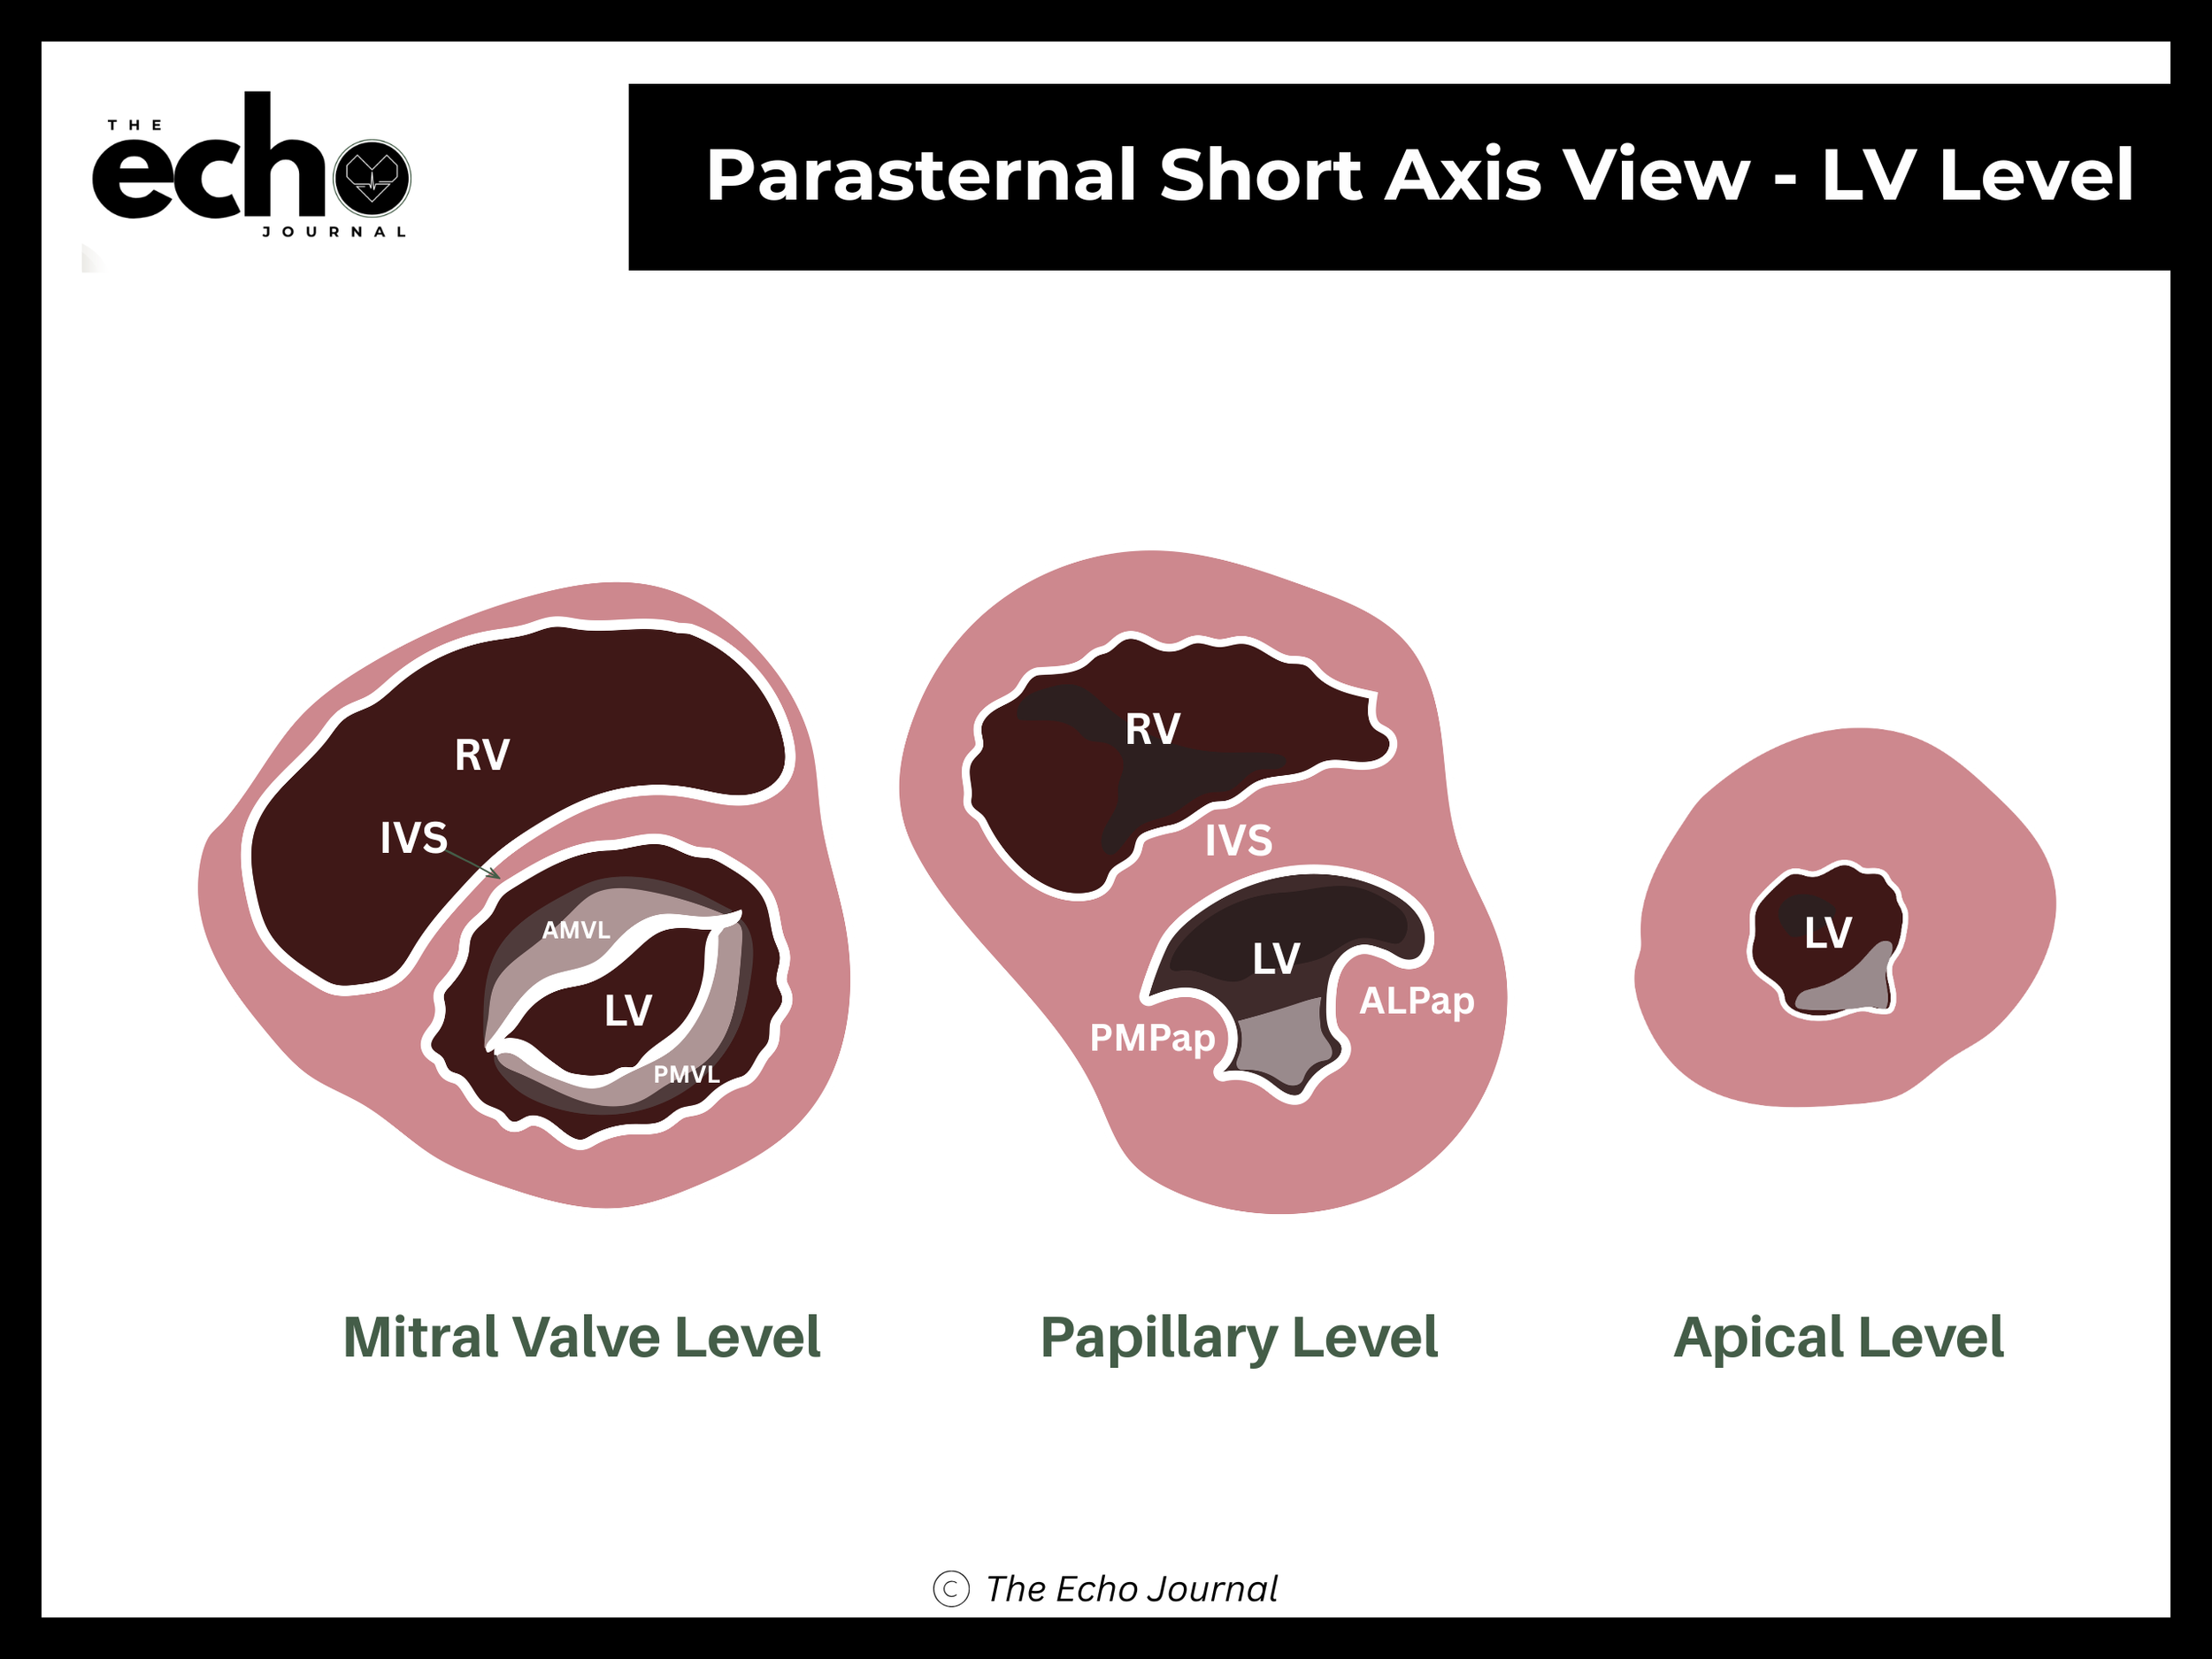
There are three levels to capture, in this order:
1. Mitral valve level — the anterior and posterior mitral leaflets open and close in the center of the LV cavity, producing the "fish mouth" appearance. Structures: RV, IVS, anterior mitral leaflet (AMVL), posterior mitral leaflet (PMVL), LV
2. Papillary muscle level — both papillary muscles are visible inside a round LV cavity. This is the level used for assessing regional wall motion and LV shape. Structures: RV, IVS, anterolateral papillary muscle (ALPap), posteromedial papillary muscle (PMPap), LV
3. Apical level — a small, thick-walled circle with no papillary muscles in view. Structures: LV apex
Getting it right: as you approach the apex, tilting alone often isn't enough — the true apex sits lower and more lateral on the chest than you expect. Slide the probe laterally, down toward the apical cap, rather than tilting to the point that your image becomes an oblique, oval-shaped slice. A round LV means you're on axis. An oval LV means you're cutting through it at an angle and any measurement you take will be wrong.
Apical Four-Chamber (A4C) View
Position the patient in the left lateral decubitus position, rolled fully onto their left side, all the way onto the hip, with the left arm raised and tucked under or behind the head. This isn't optional comfort positioning; rolling the patient brings the heart forward against the chest wall and shifts lung tissue out of the beam's path.
How do you obtain an apical four-chamber view? Slide the probe down and laterally to the point of maximal impulse — the spot below the left breast where you can feel the heartbeat against the chest wall. Aim the beam up toward the patient's right shoulder, and point the index marker toward the patient's left side (roughly 3 o'clock). Keeping the patient well rolled onto their left side makes this view dramatically easier to find.
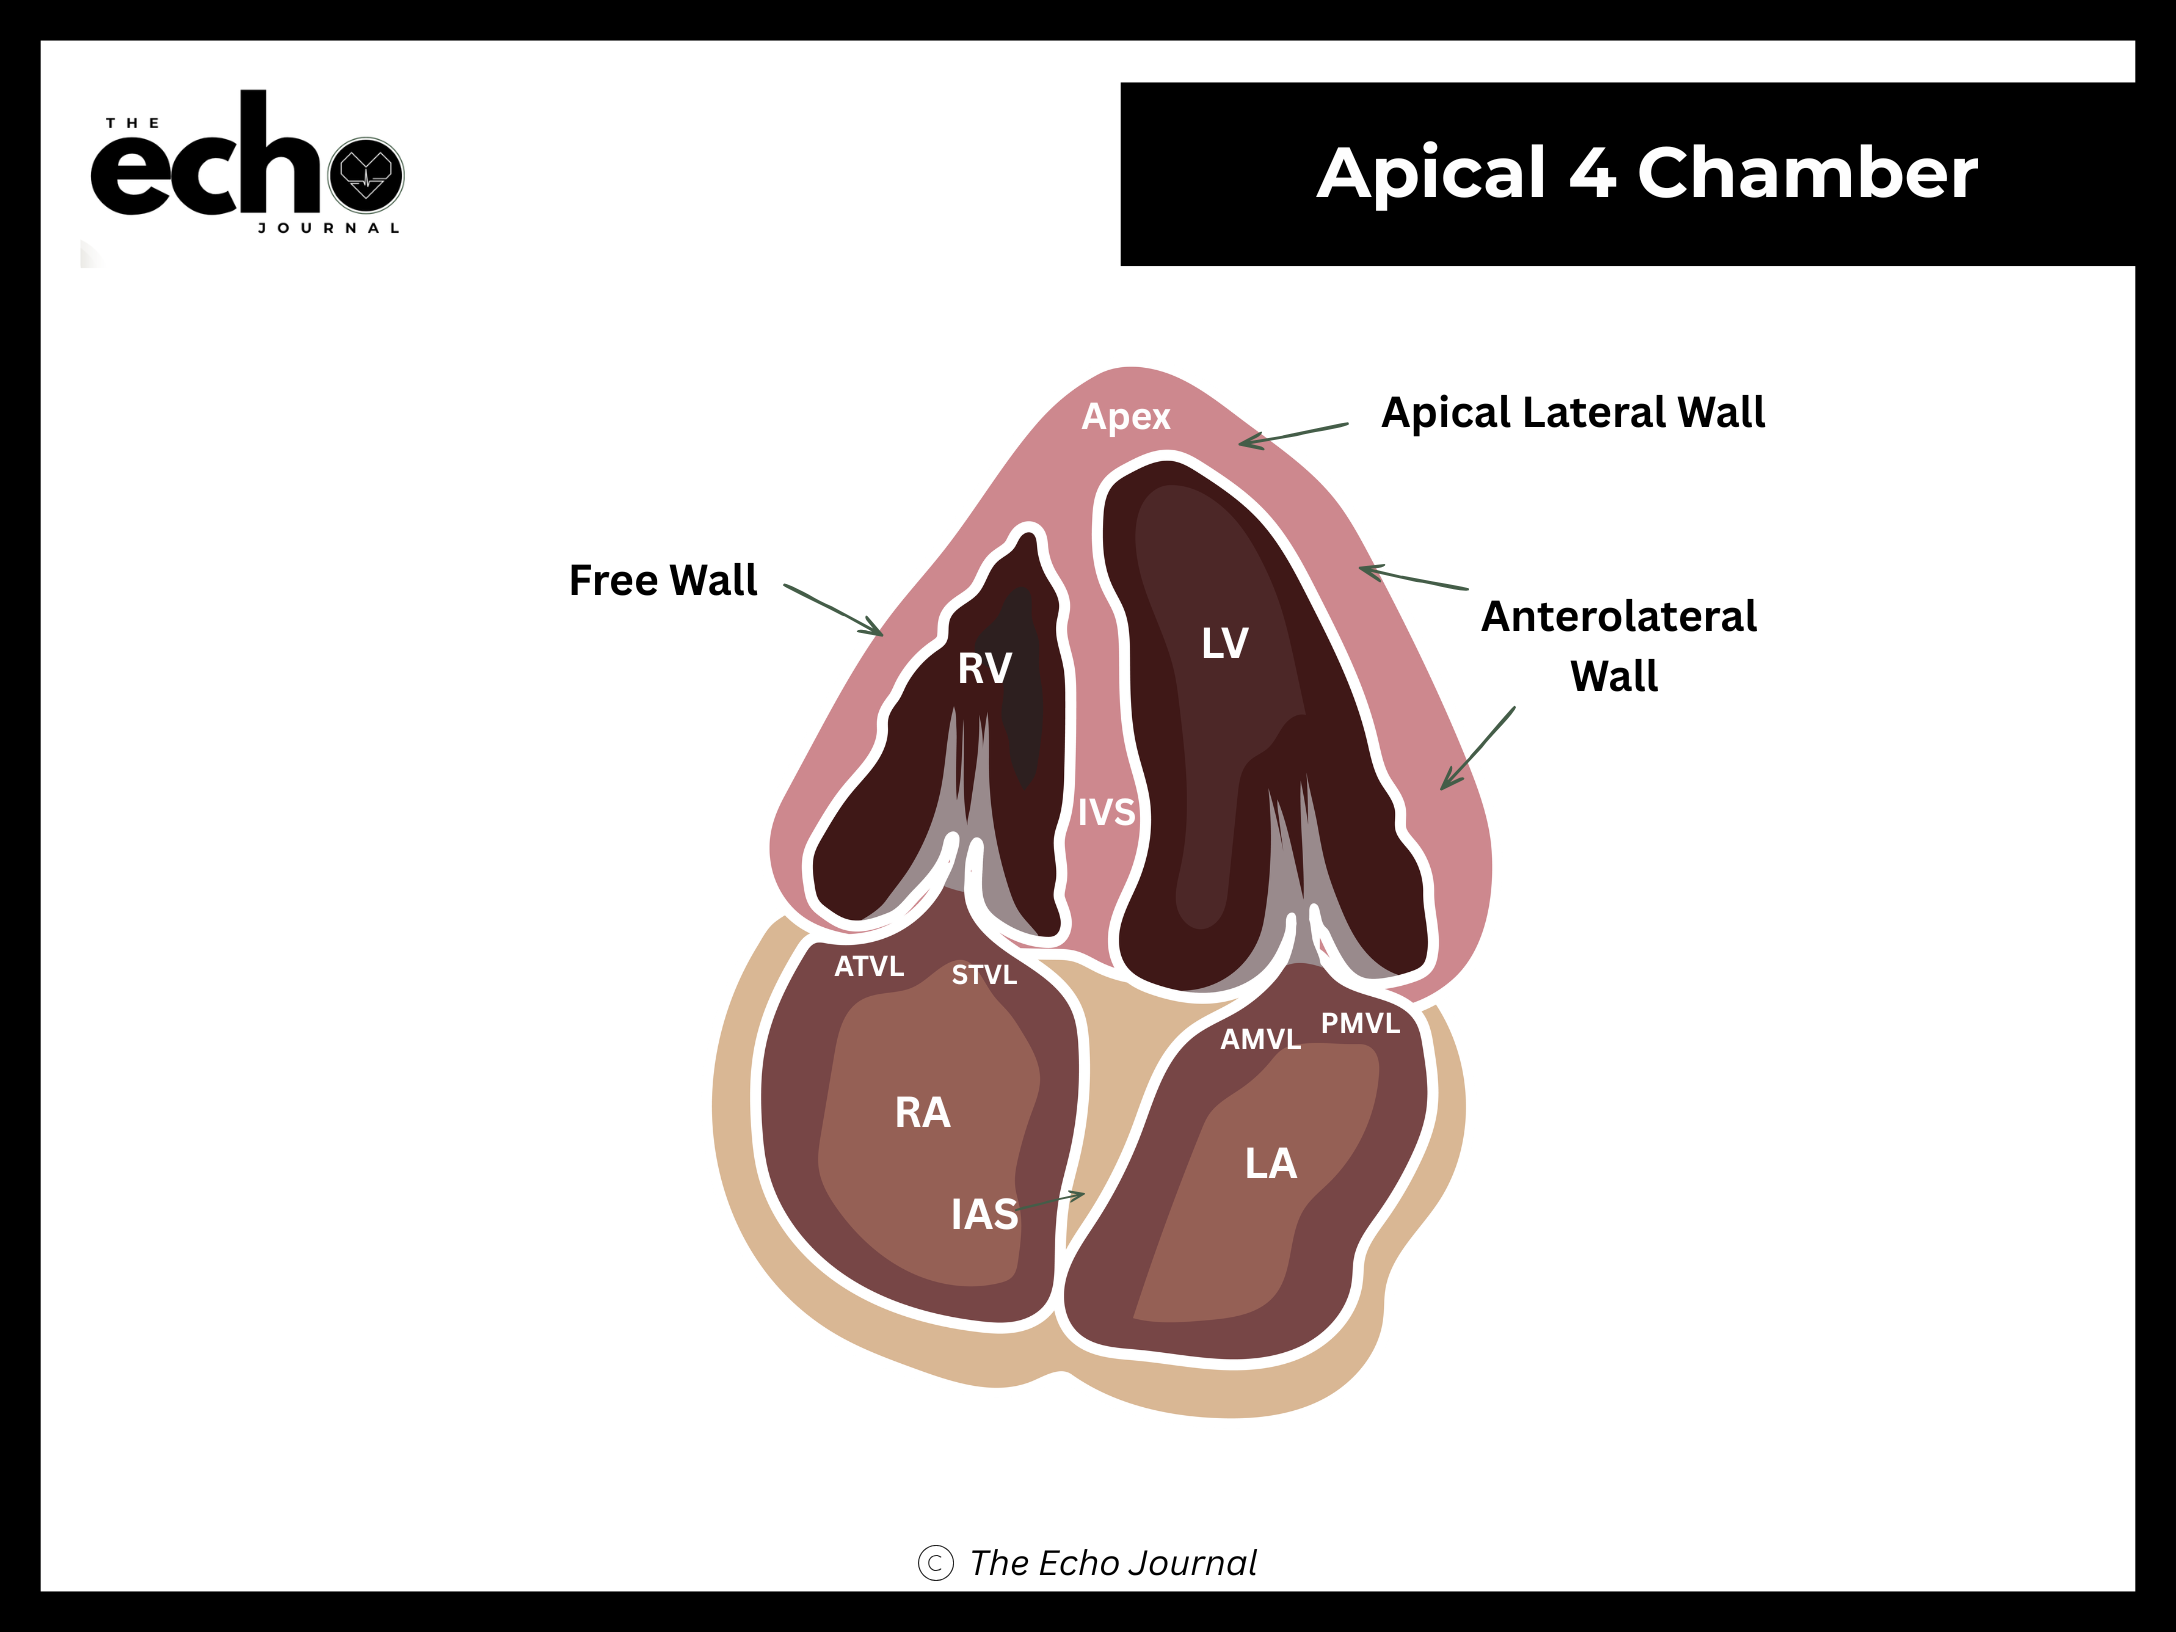
Structures you should be able to identify:
Left ventricle (LV), left atrium (LA) and apex
Right ventricle (RV) and right atrium (RA)
Mitral valve (anterior and posterior leaflets) and tricuspid valve (anterior and septal leaflets)
Interventricular septum (IVS)
Interatrial septum (IAS)
Getting it right: the number one beginner error here is foreshortening — cutting across the apex instead of through it, which makes the LV look shorter and rounder than it really is and falsely inflates ejection fraction. If the apex looks blunt or thick, you are too high on the chest. Move down an interspace and more laterally, not just angle differently.
Apical Two-Chamber (A2C) View
How do you obtain an apical two-chamber view? From the A4C view, keep the probe in exactly the same spot and rotate approximately 60 degrees counterclockwise. The right-sided chambers drop out of the image and you are left with the LV and LA only.
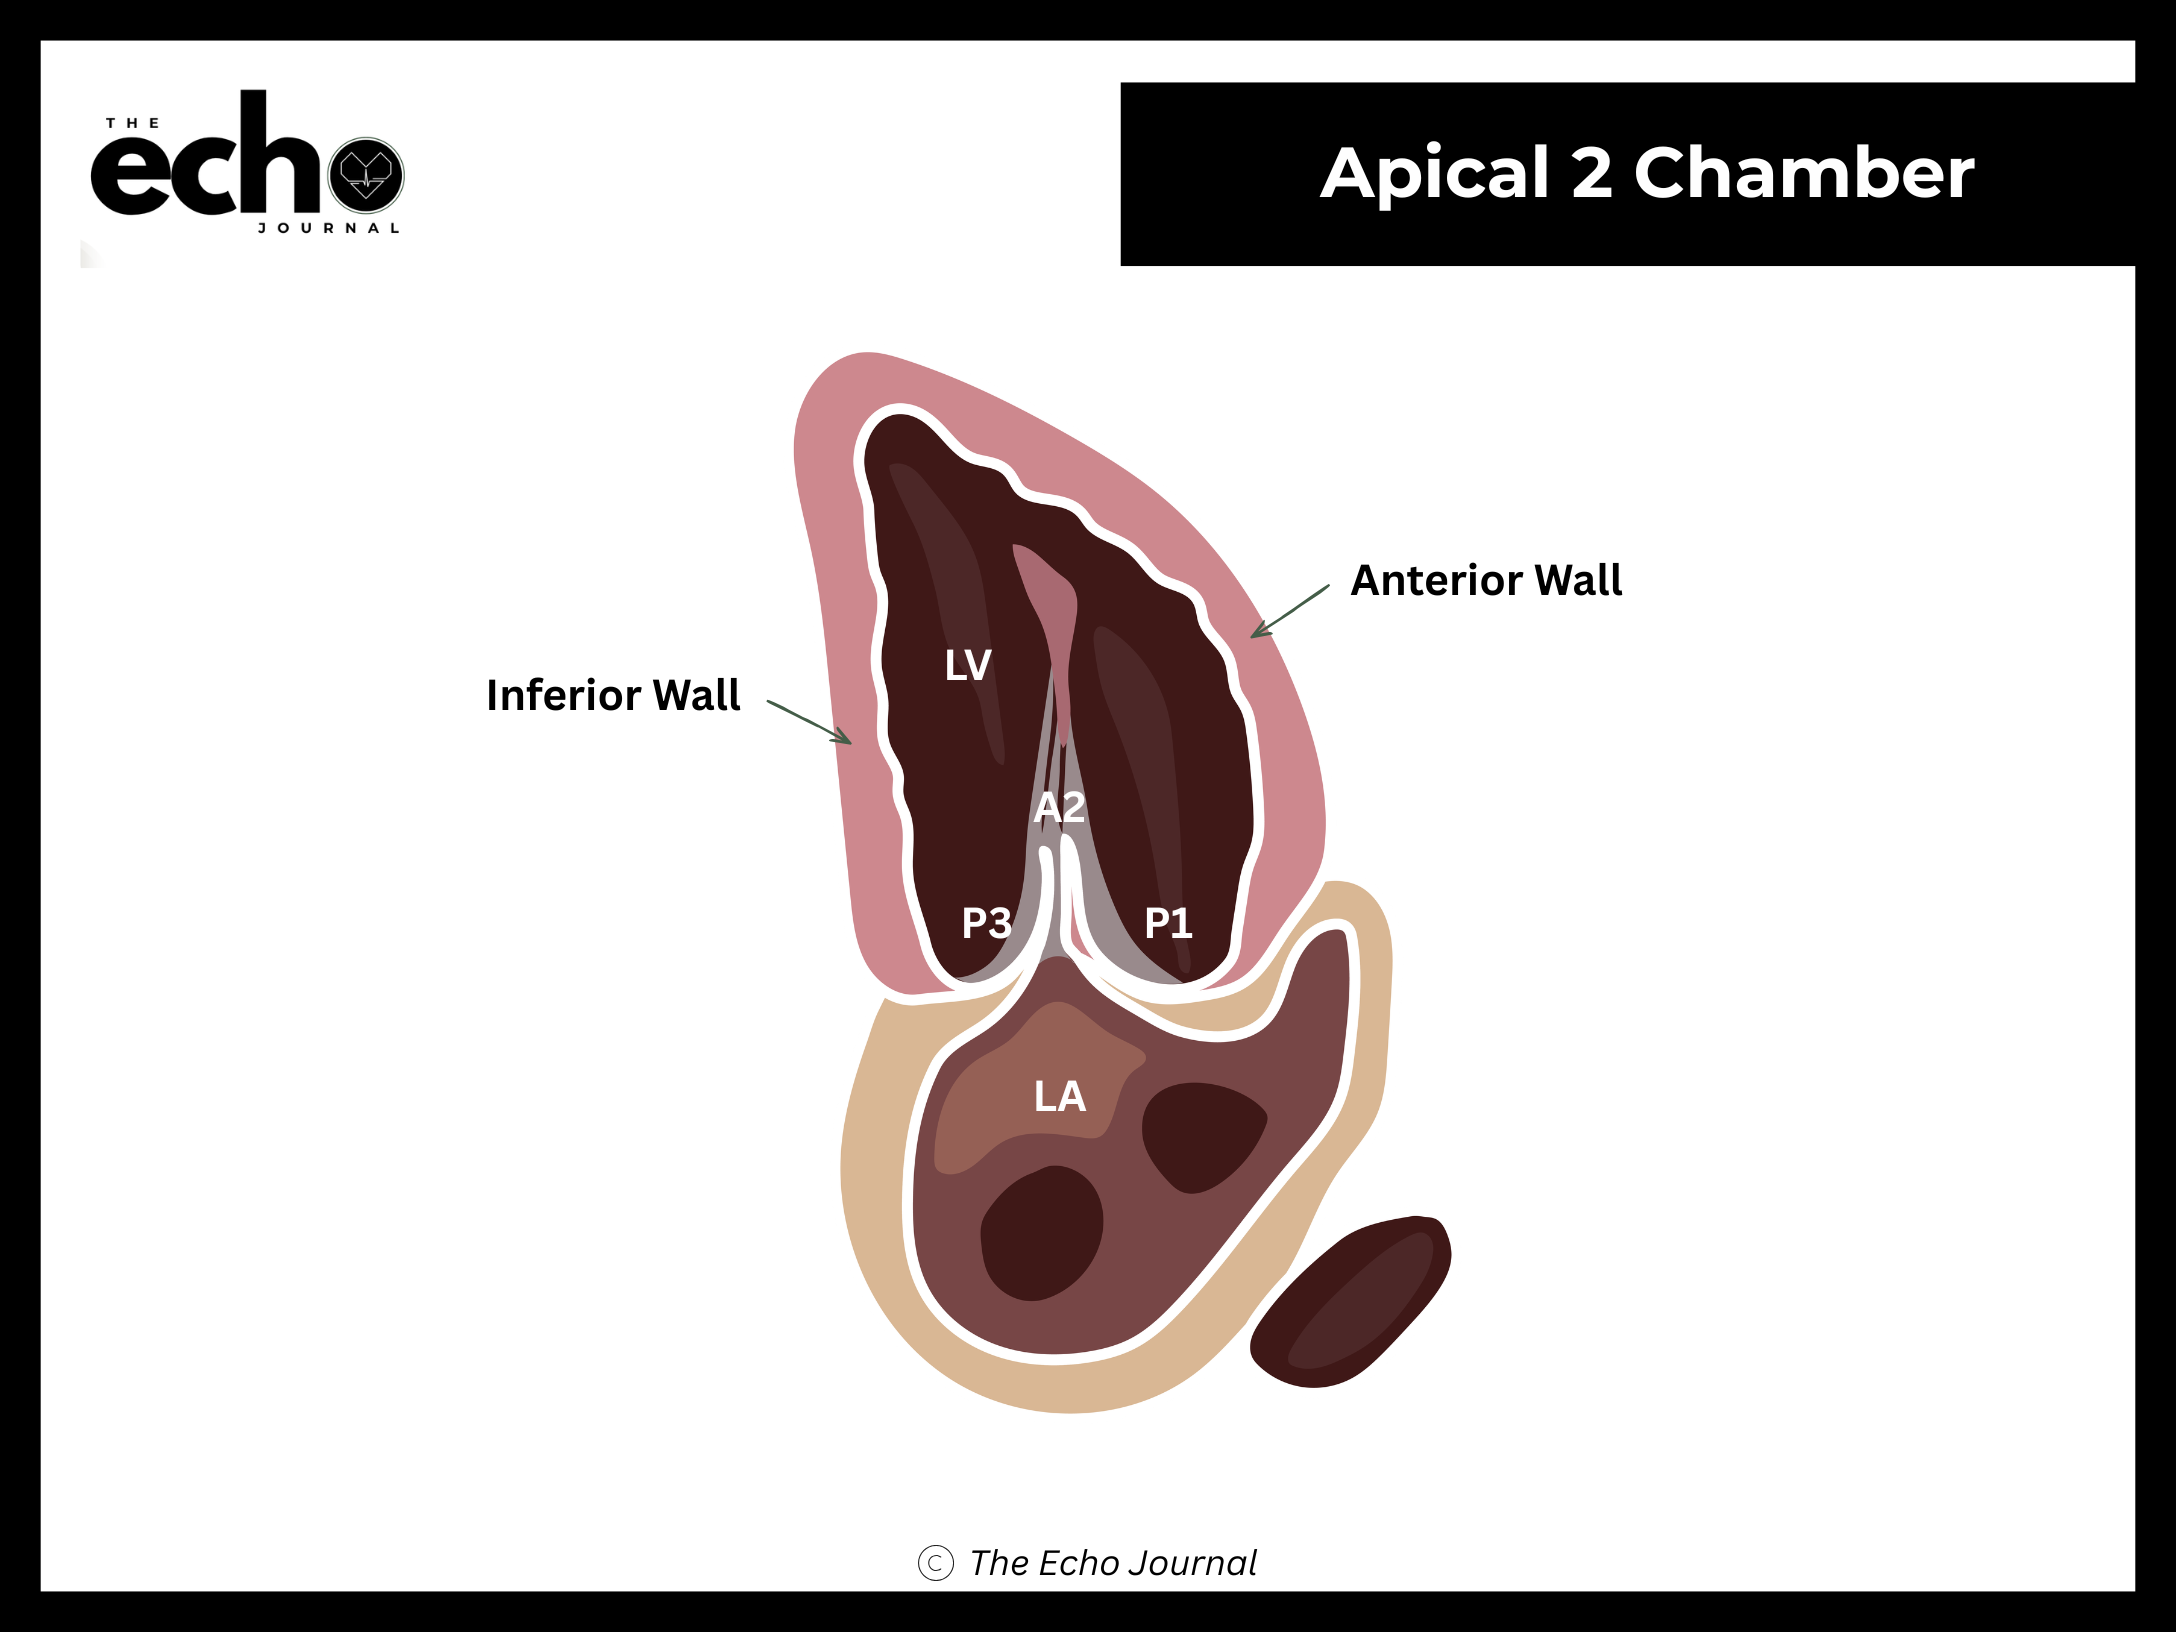
Structures you should be able to identify:
Left ventricle (LV) — anterior and inferior walls
Mitral valve (MV) — each mitral leaflet is divided into 3 scallops, anterior (A1,A2,A3) and posterior (P1,P2,P3), some seen in this view
Left atrium (LA)
Getting it right: you know you have a true A2C when no right ventricle is visible anywhere in the sector. If you can still see a sliver of RV, keep rotating.
Apical Long-Axis (A3C) View
How do you obtain an apical long-axis view? From the A2C view, rotate another 60 degrees counterclockwise. The aortic valve and outflow tract come into view.
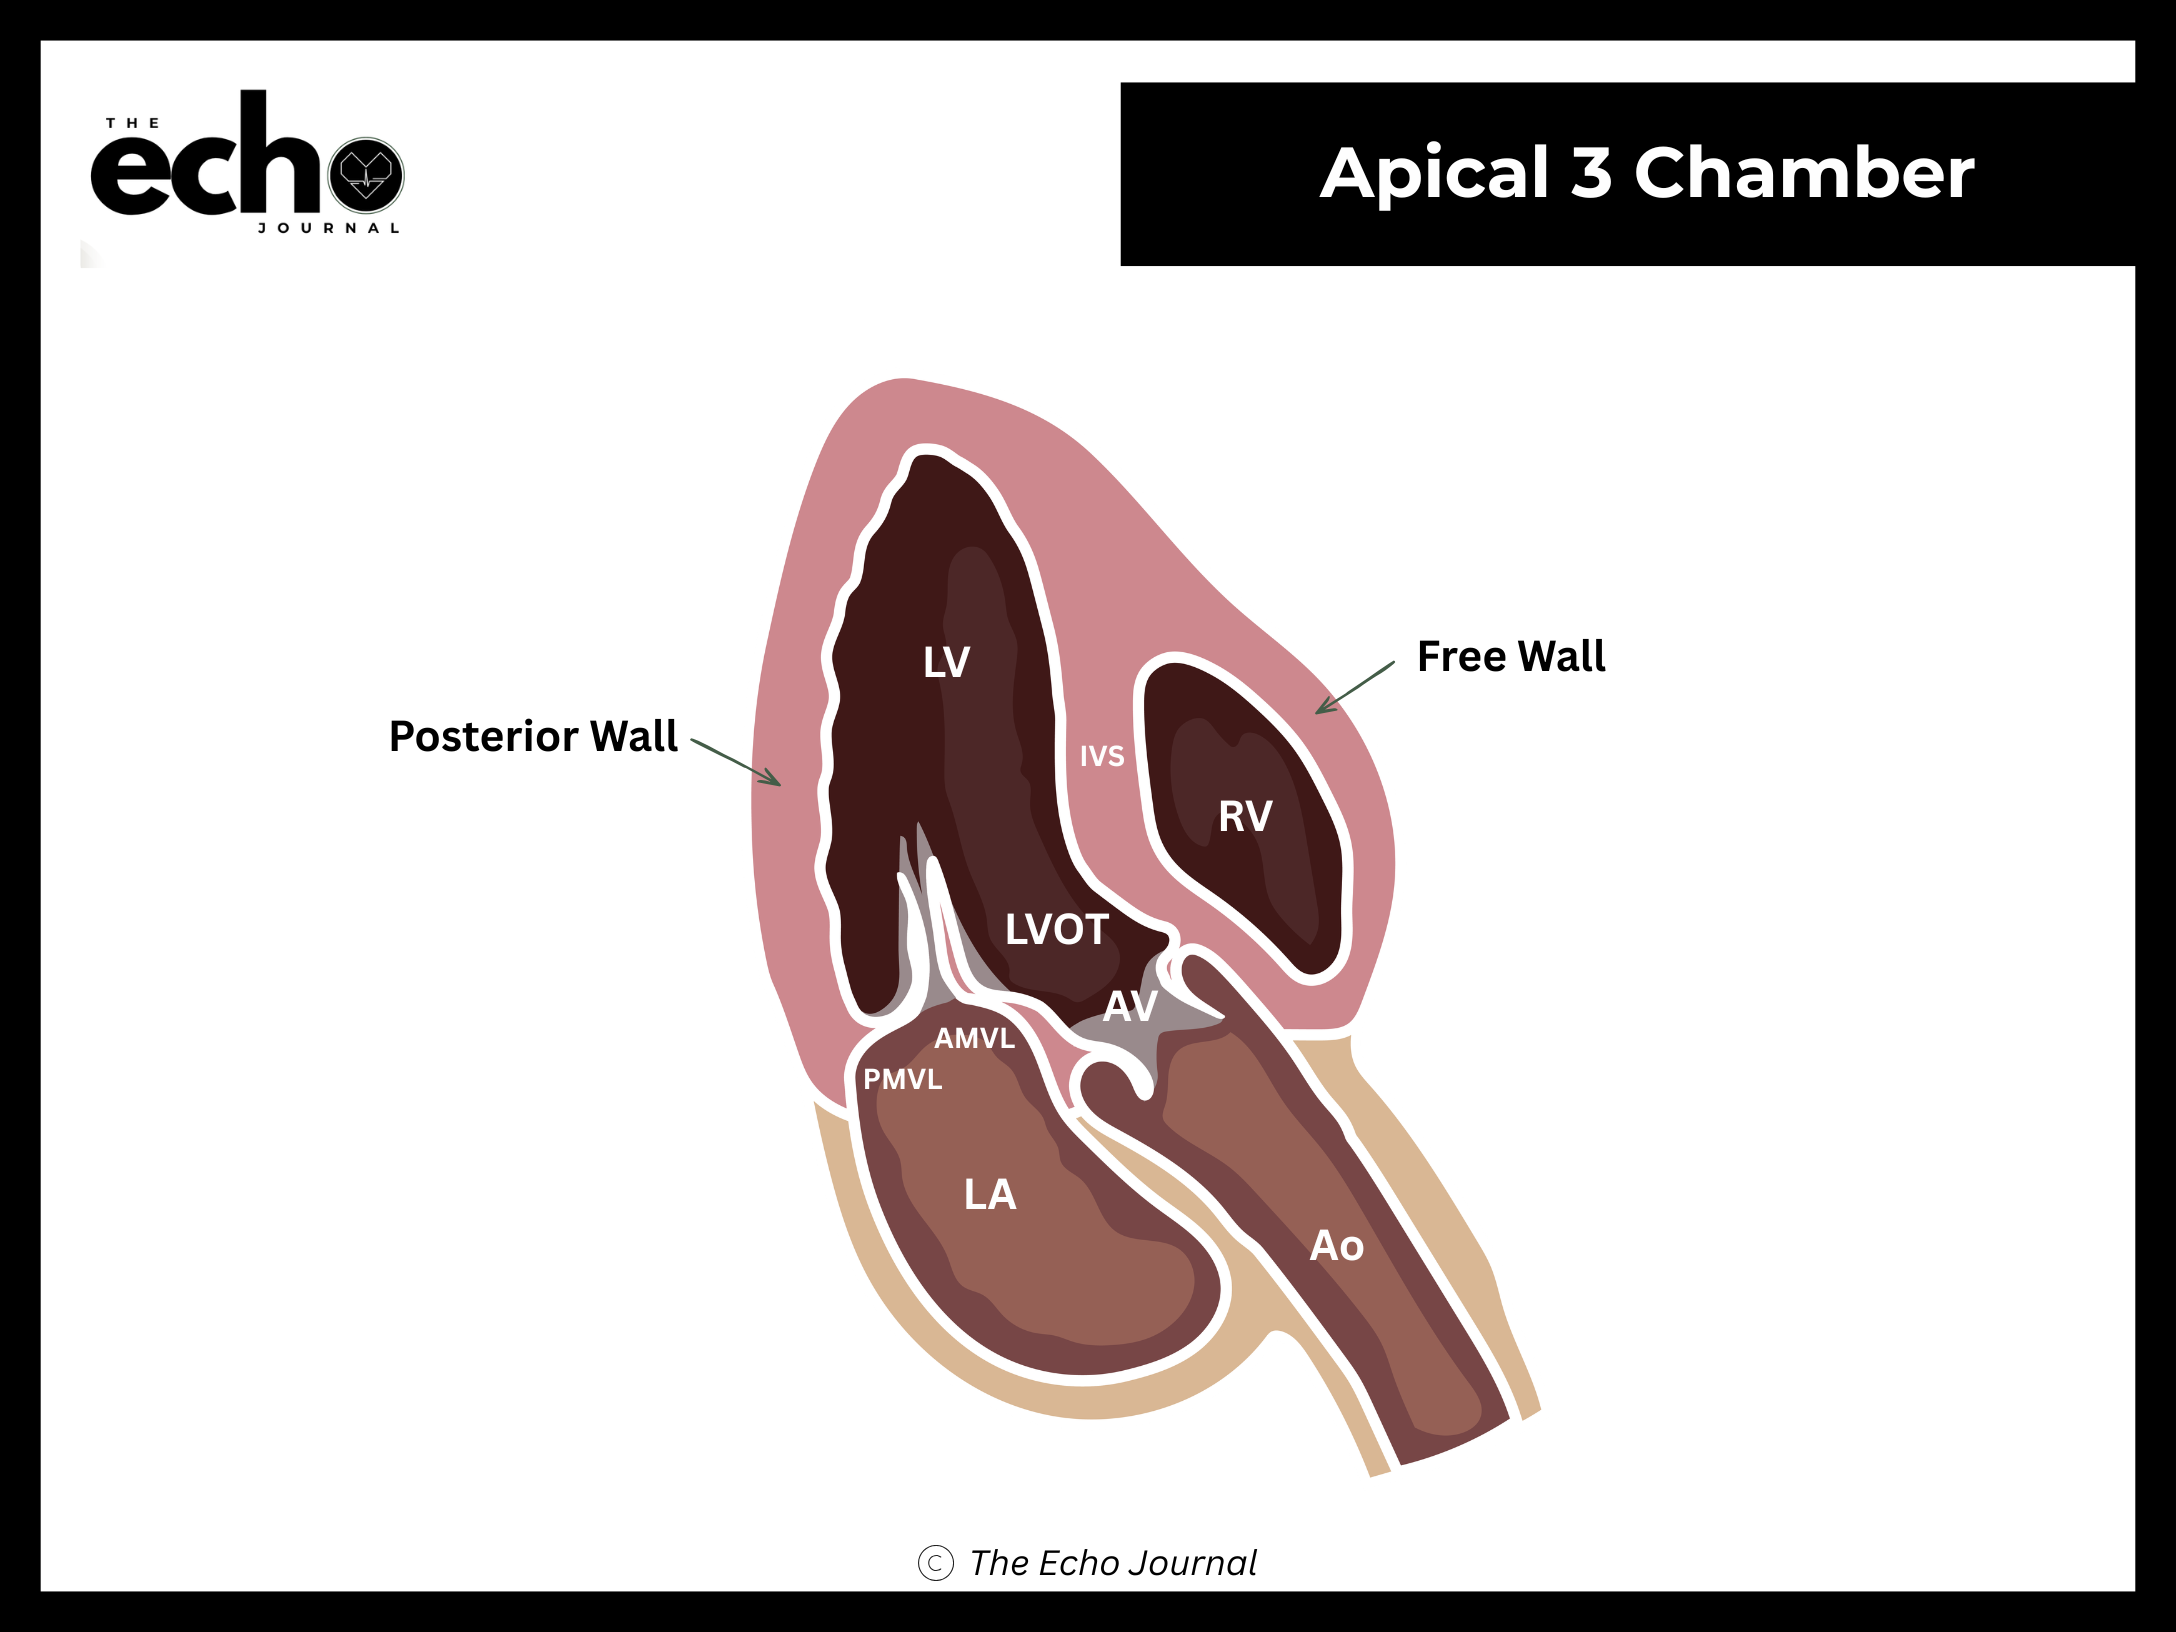
Structures you should be able to identify:
Left ventricle (LV) — anteroseptal and posterior walls
Left atrium (LA)
Mitral valve (MV)
Left ventricular outflow tract (LVOT)
Aortic valve (AV) and proximal aorta
Getting it right: this view shows the same structures as PLAX, but from the apex. That matters because it gives you a beam angle nearly parallel to LVOT flow, which is exactly what you need for accurate Doppler measurements.
Apical Five-Chamber (A5C) View
How do you obtain an apical five-chamber view? From the A4C view, keep the probe in the same spot and do not rotate it. Tilt the beam anteriorly — the tail of the probe drops toward the bed, aiming the beam slightly more toward the patient's chest wall. The left ventricular outflow tract and aortic root swing into the center of the image, between the two atria.
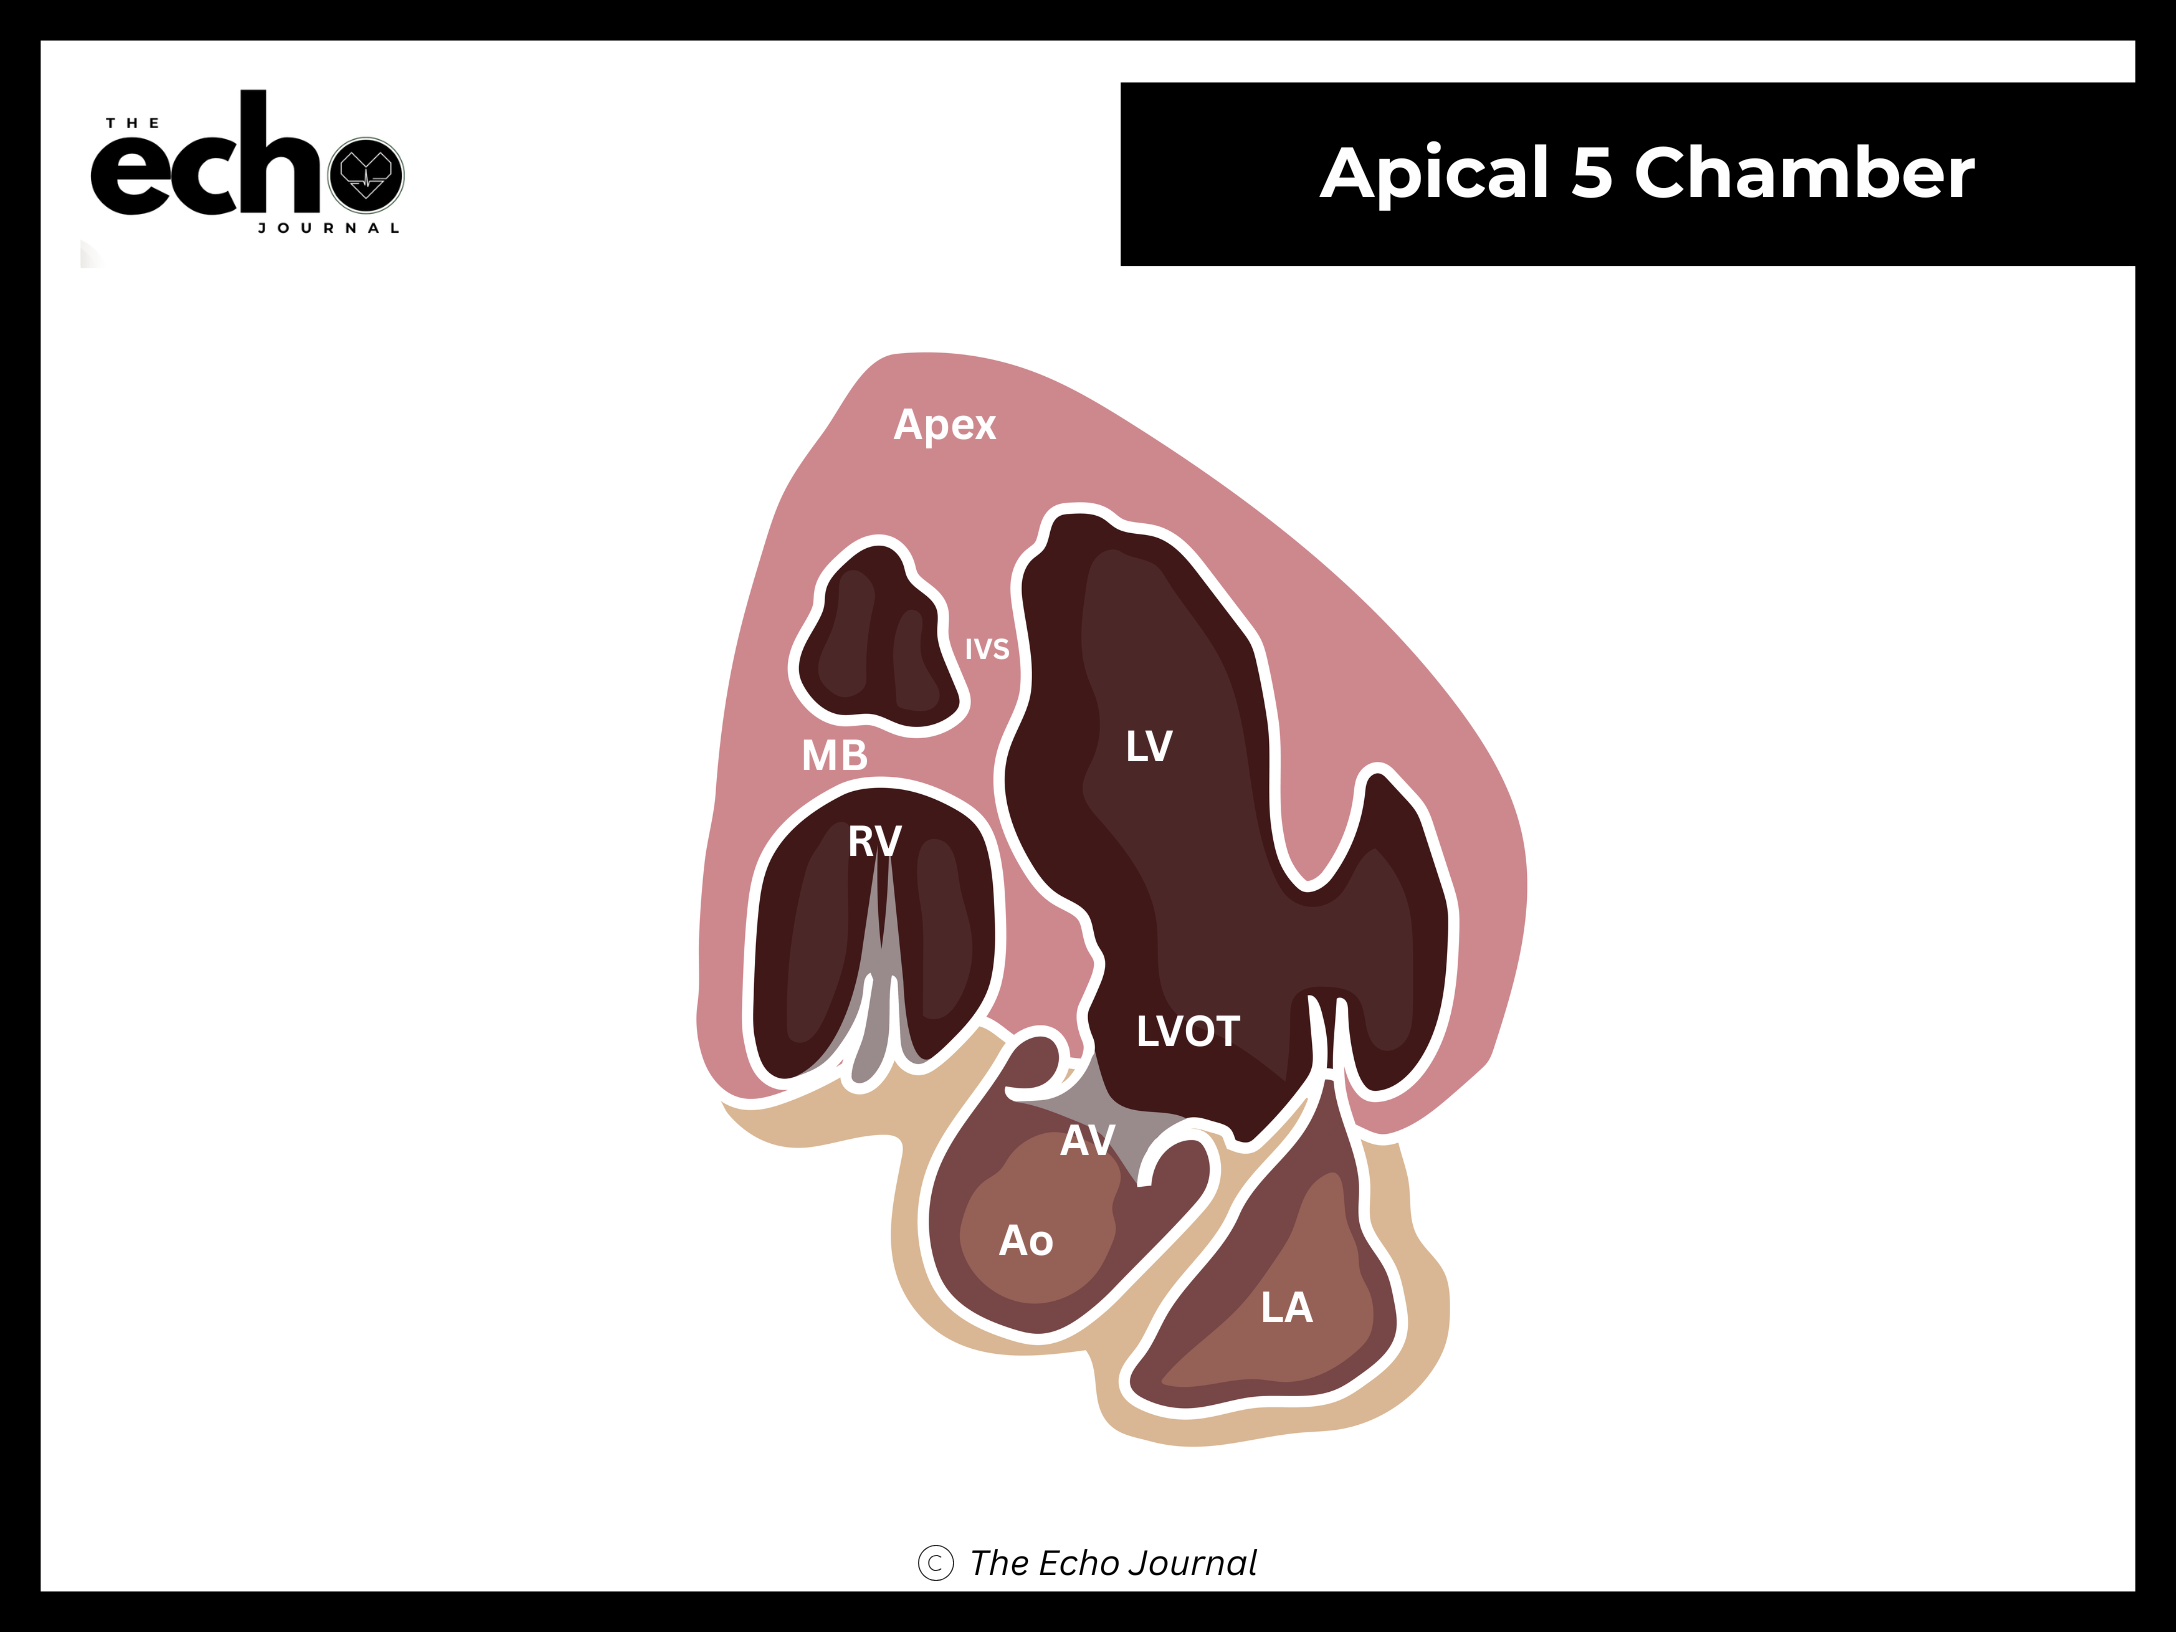
Structures you should be able to identify:
Left ventricle (LV) and left atrium (LA)
Right ventricle (RV) and the moderator band (MB)
Mitral valve (MV)
Interventricular septum (IVS)
Left ventricular outflow tract (LVOT)
Aortic valve and aortic root (Ao) — the "fifth chamber" the view is named for
Why this view matters: the LVOT sits nearly parallel to your beam here, which is exactly the alignment Doppler requires. This is the view used for pulsed-wave Doppler at the LVOT for stroke volume and cardiac output, and for continuous-wave Doppler across the aortic valve when assessing aortic stenosis. Every one of those measurements is angle-dependent, so a sloppy A5C produces a confidently wrong number.
Getting it right: the aorta should appear centered, not tucked into a corner. Tilt in small increments — beginners overshoot, lose the LV apex, and end up with an oblique plane that belongs to no named view. And don't confuse the A5C with the apical long axis: the A5C comes from tilting out of A4C and keeps both right-sided chambers in view, while the apical long axis comes from rotating and drops the right side entirely.
Subcostal (SC) View
How do you obtain a subcostal view? Have the patient roll onto their back, flat, with knees bent to relax the abdominal wall. Place the probe just below the xiphoid process, angled up under the ribs toward the left shoulder. Point the index marker toward the patient's left side (roughly 3 o'clock). Asking the patient to take a breath in and hold it brings the heart down toward the probe.
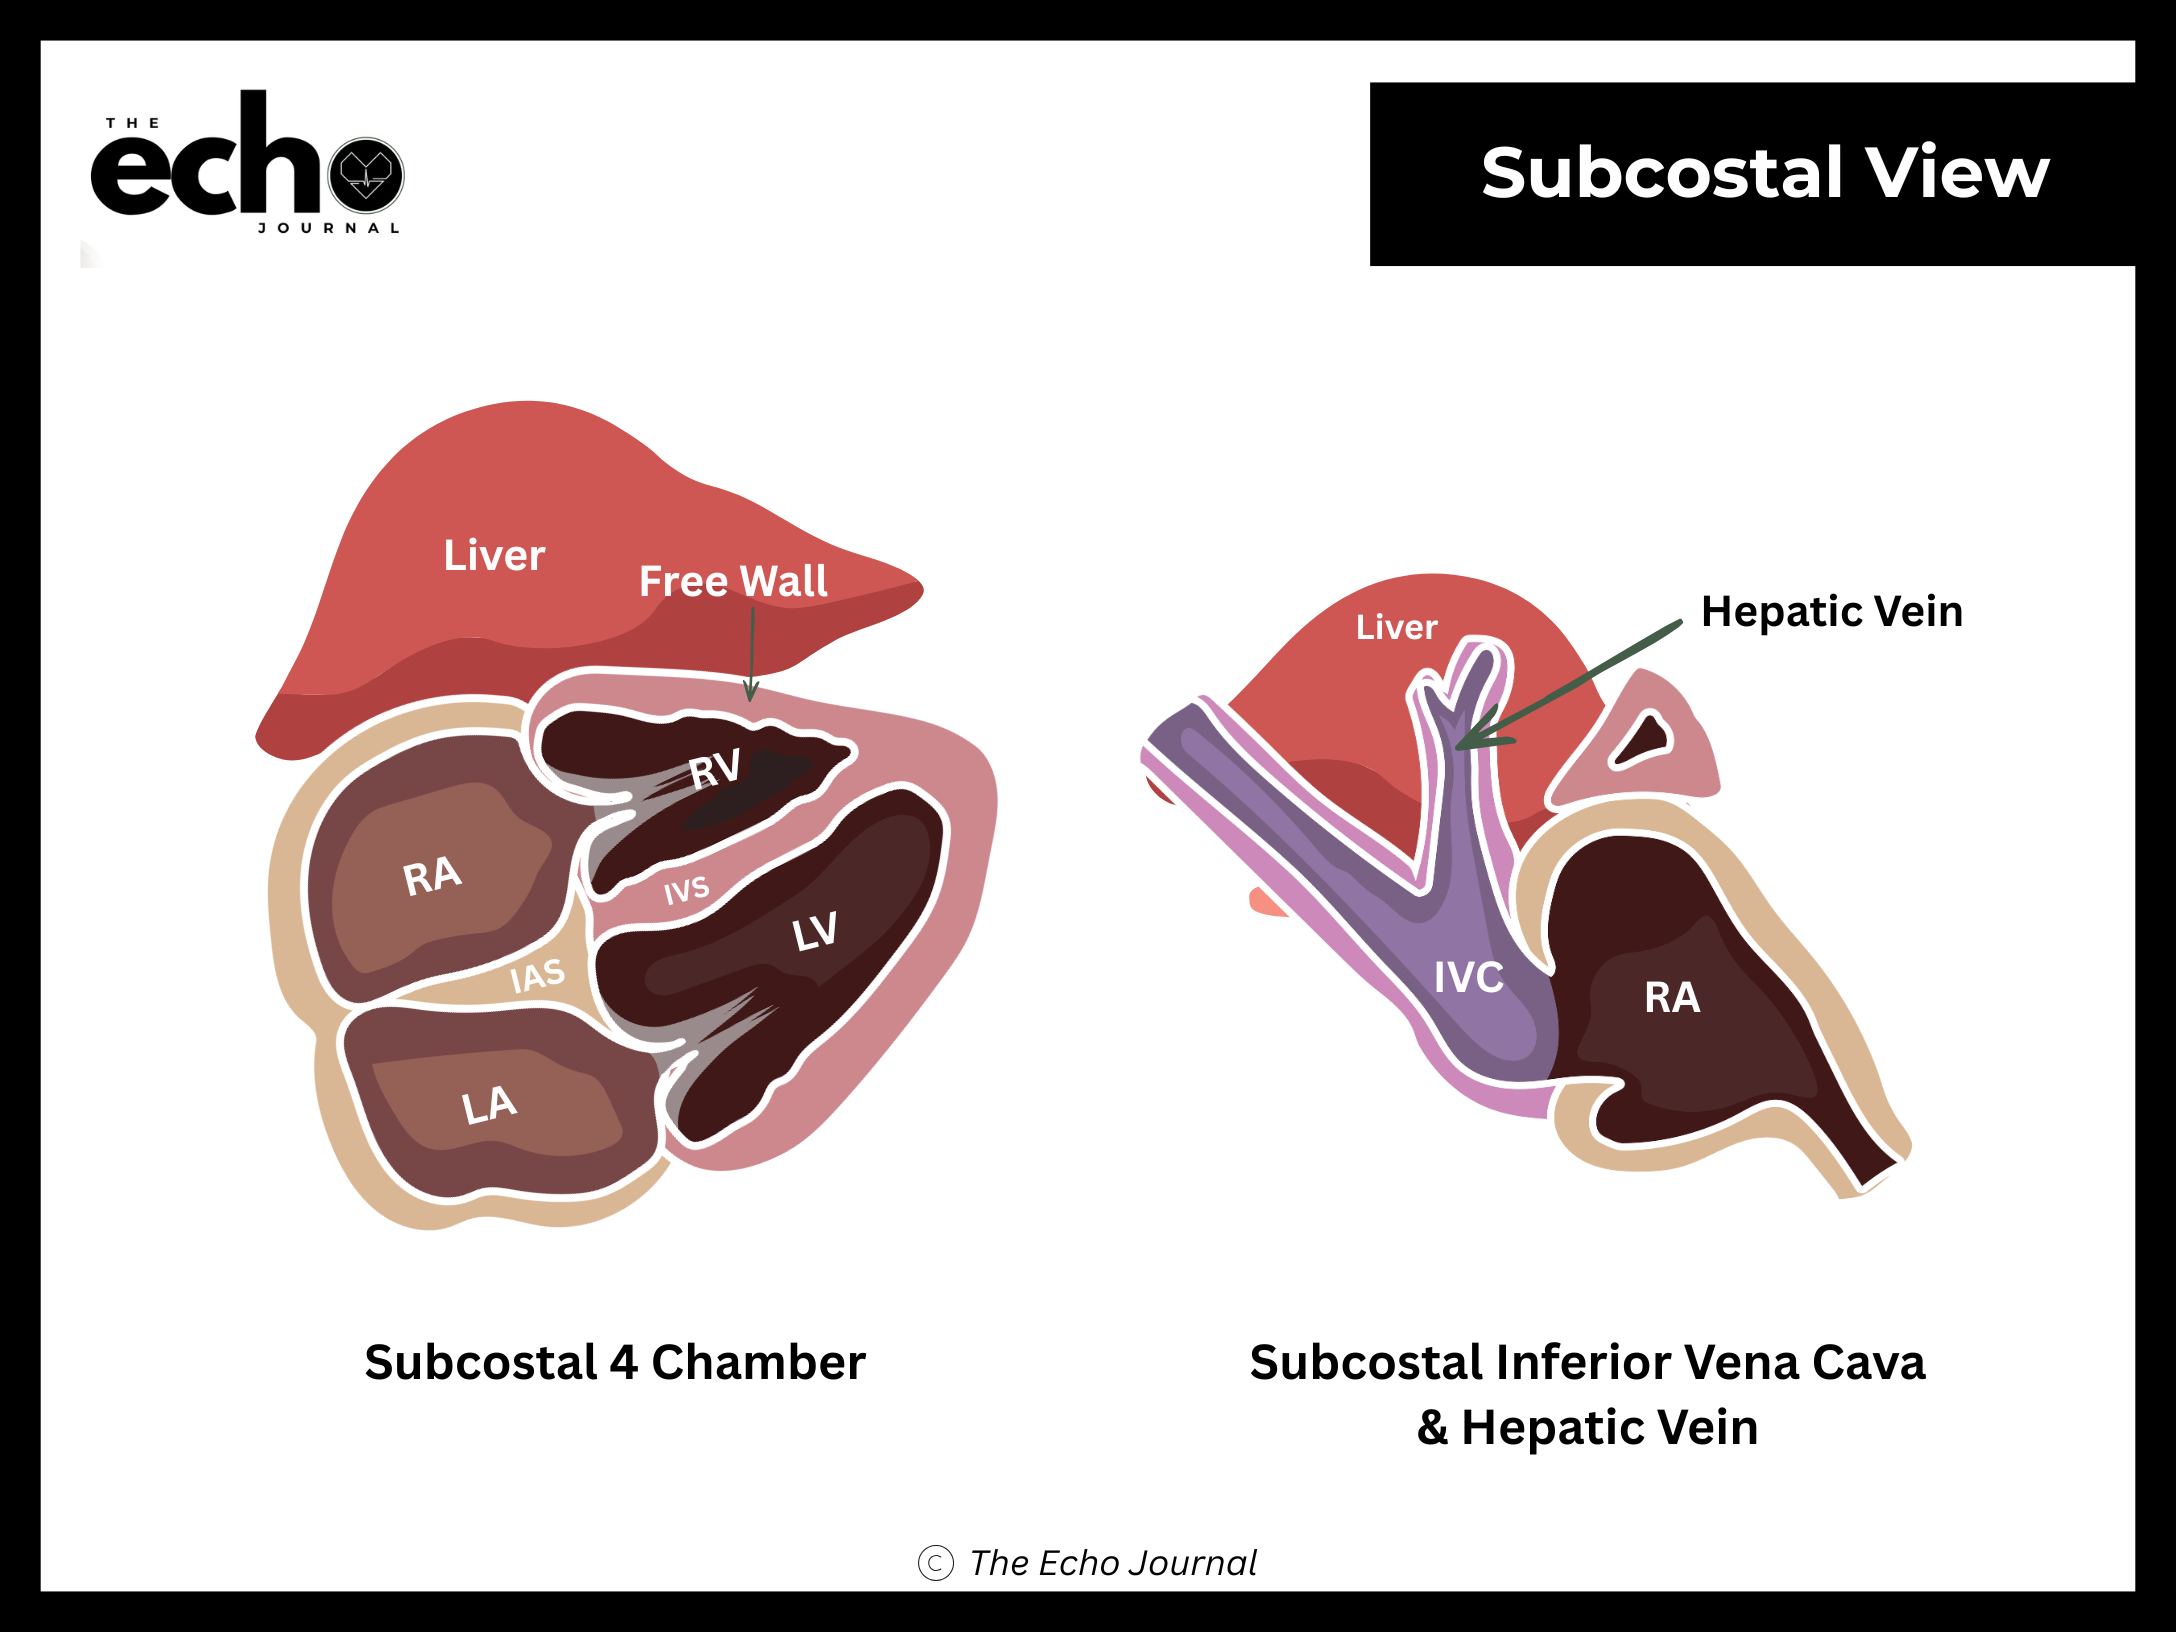
Structures you should be able to identify:
Liver, used as your acoustic window
All four chambers, with the interatrial septum lying perpendicular to the beam
Interatrial septum (IAS) — this is the best view in the whole study for detecting a septal defect
Pericardium — the best view for detecting effusion and tamponade physiology
Inferior vena cava (IVC) and hepatic veins can be visualized by rotating counter clockwise with the index marker at the 12 o’clock position and the probe upright and perpendicular to the surface of the skin. Rock superiorly and slightly rightward.
Getting it right: you need a flatter probe angle than feels natural to get the subcostal 4 chamber view. Beginners tend to hold the probe too upright; lay the handle down closer to the abdomen so the beam sweeps under the ribs rather than into them. The opposite holds to see the inferior vena cava, the probe needs to be more upright and rocked to visualize the inferior vena cava and hepatic vein.
Suprasternal Notch (SSN) View
How do you obtain a suprasternal notch view? Keep the patient flat and ask them to extend the neck and turn the head slightly to the left. Place the probe in the small hollow above the sternum at the base of the neck, and angle it almost parallel to the neck, aiming down and slightly toward the left. Point the index marker to roughly 12–1 o'clock.
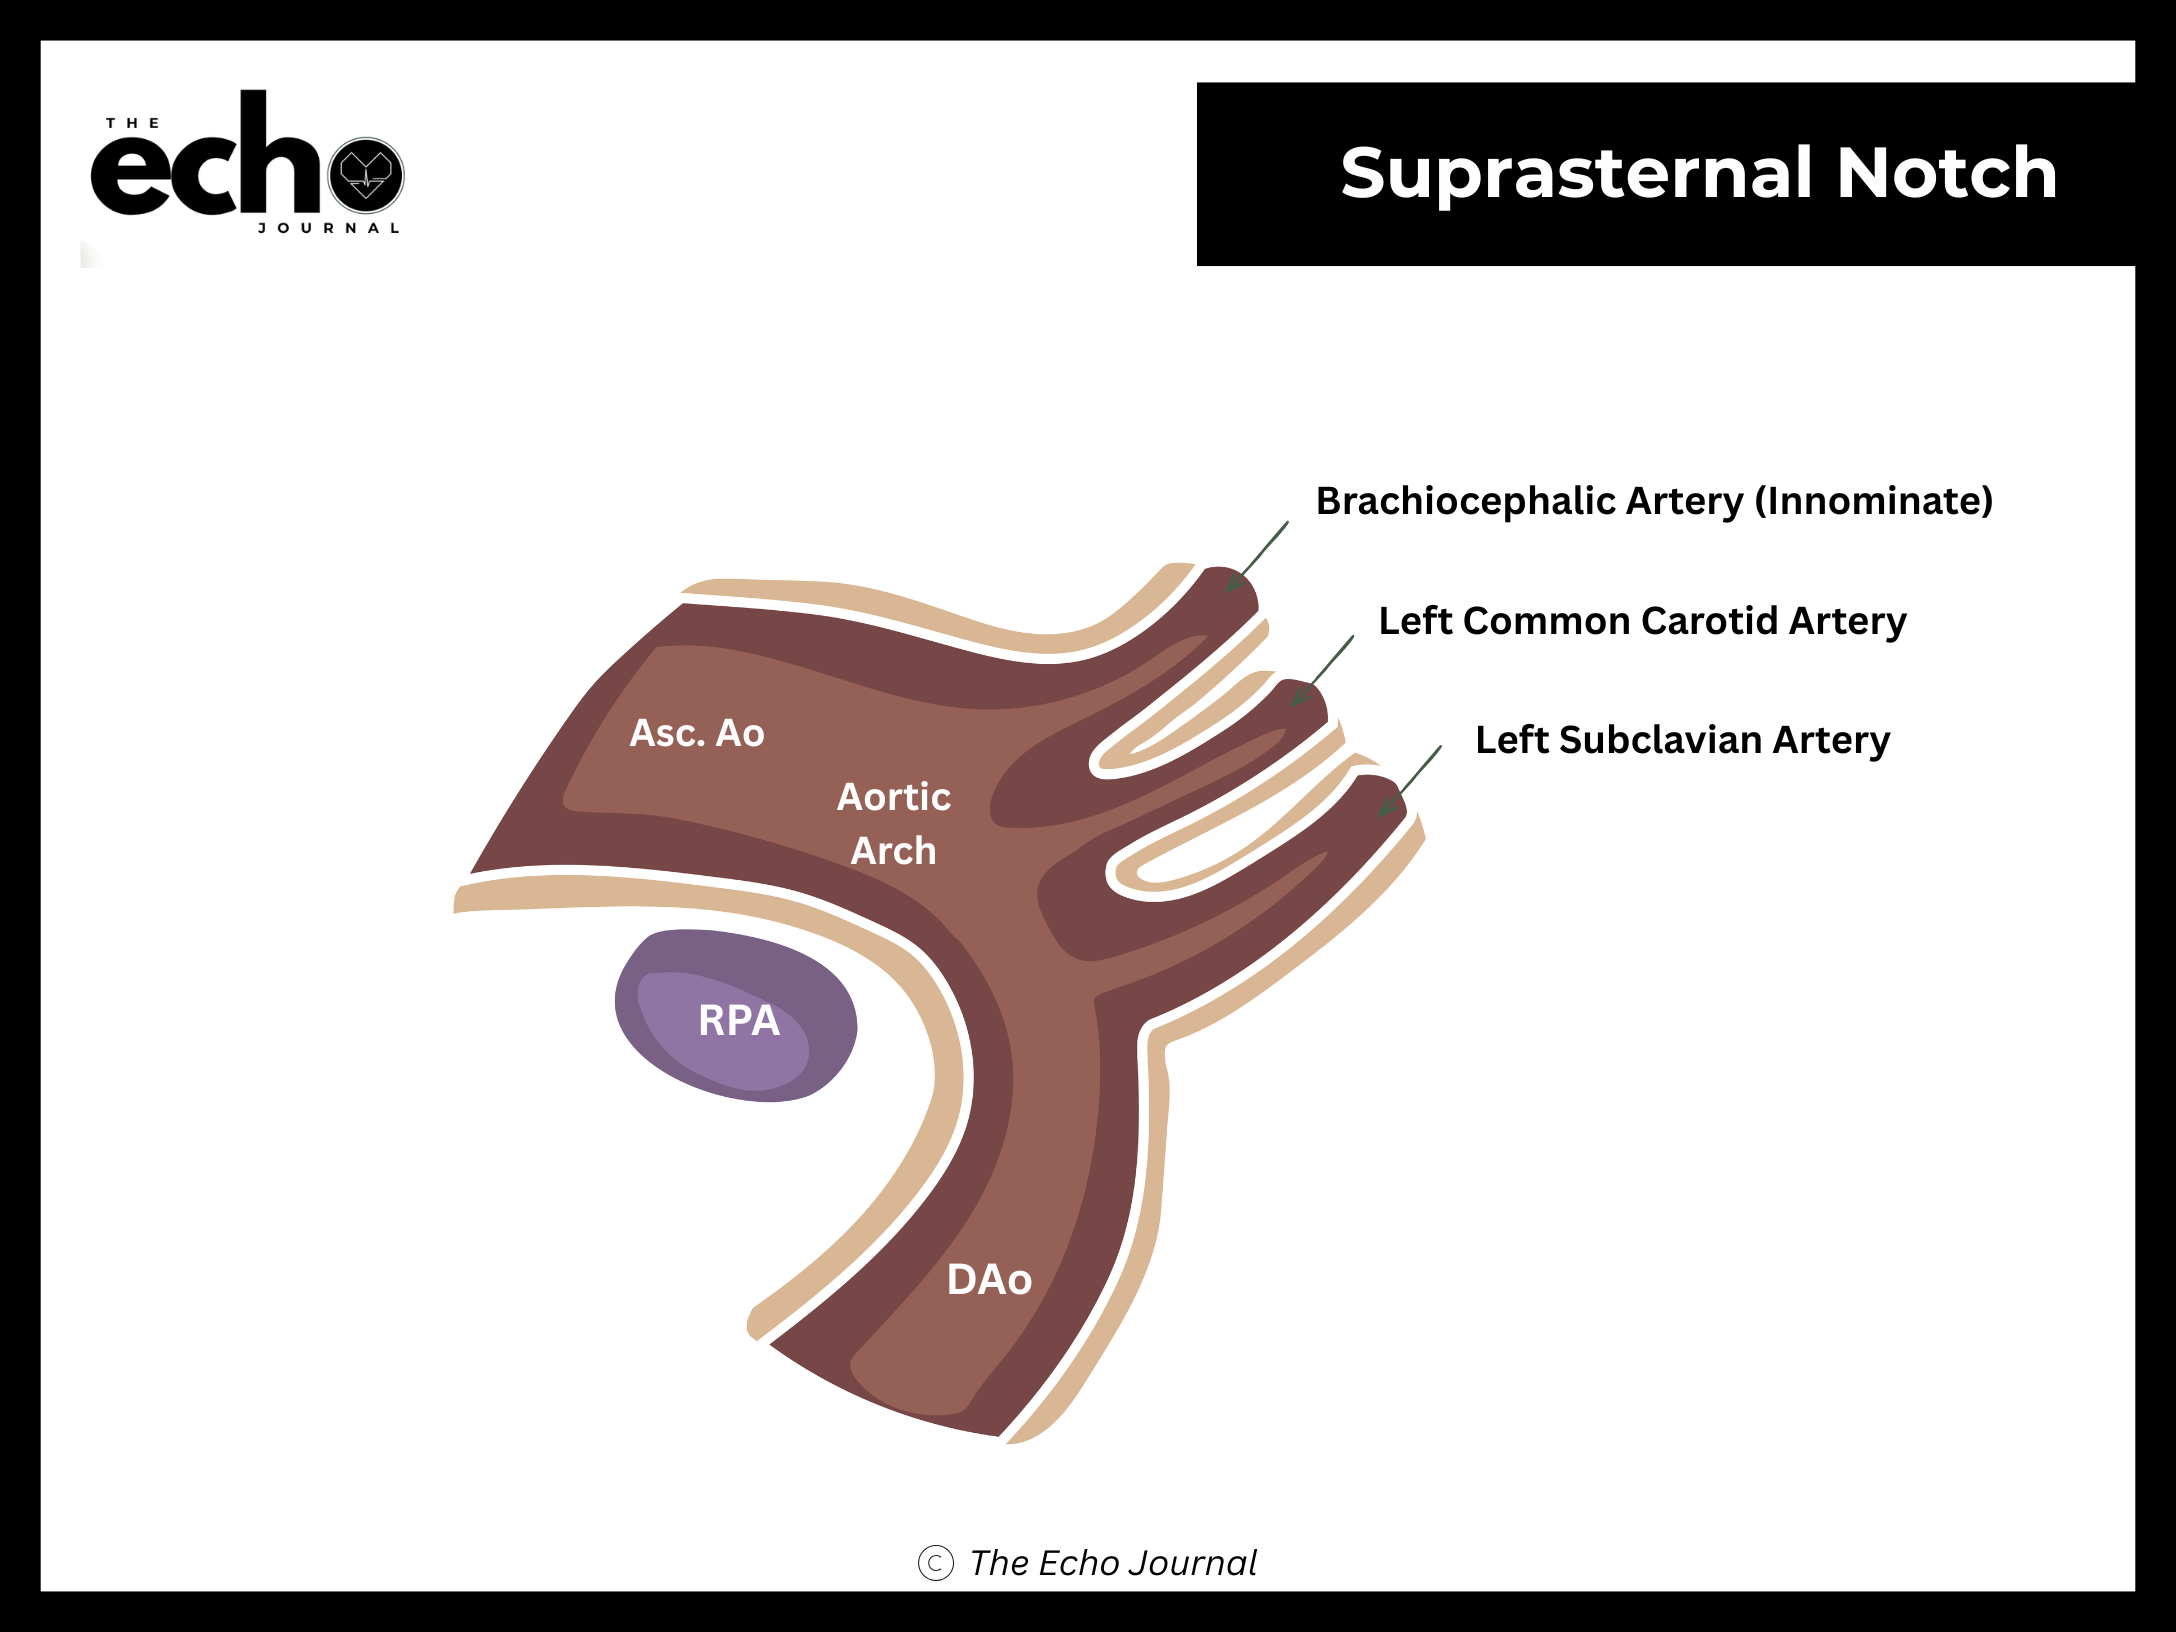
Structures you should be able to identify:
Aortic arch
Ascending and descending aorta (DAo)
The three great vessels branching off the arch: brachiocephalic (innominate), left common carotid (LCC), and left subclavian arteries (LSA)
Right pulmonary artery, seen in cross-section beneath the arch
Getting it right: this window is small and unforgiving, so use small rocking and angling adjustments rather than sliding. A pillow removed from under the head, or a rolled towel placed under the shoulders, often turns an impossible window into an easy one.